Facebook Channel
The Facebook channel can handle multiple accounts and will create tickets on new posts on your Facebook page and messages to the page.
Activate or Deactivate Channel
The Facebook channel is disabled by default and needs to be activated before use. To do this, go to Settings -> Tickets -> Channels and click the "Activate" link on the Facebook channel row. The channel can be deactivated in the same way, instead this time by clicking the "Deactivate" link on the same row.
Creating an Account
Prerequisites
Before proceeding any further with this guide, please ensure you meet the following prerequisites:
- Access to a Facebook account.
- SSL (HTTPS) enabled on your helpdesk.
-
A Facebook page for your business. If you don't already have one, please
create one.
- Your page must be published (publicly visible) for the integration to work.
Facebook Setup
The integration requires a Facebook page and Facebook developer application to function. Below guides you through the process to set this up.
- Login to Facebook.
-
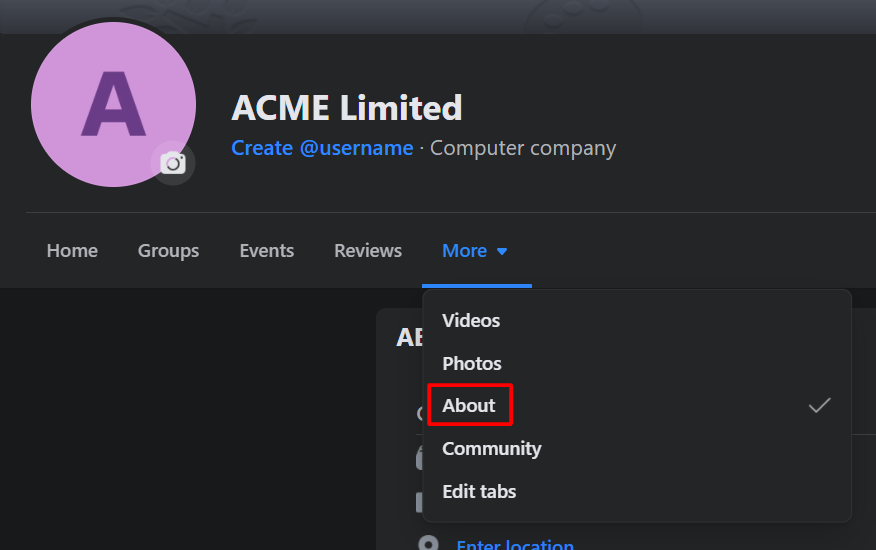
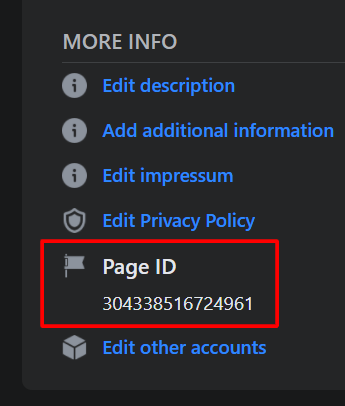
Browse to your Facebook page, click the "About" link under the "More" dropdown, and scroll down to the "Page ID" row.
-
Visit the "My Apps" page on the Facebook developers website
and click the "Create App" button.

-
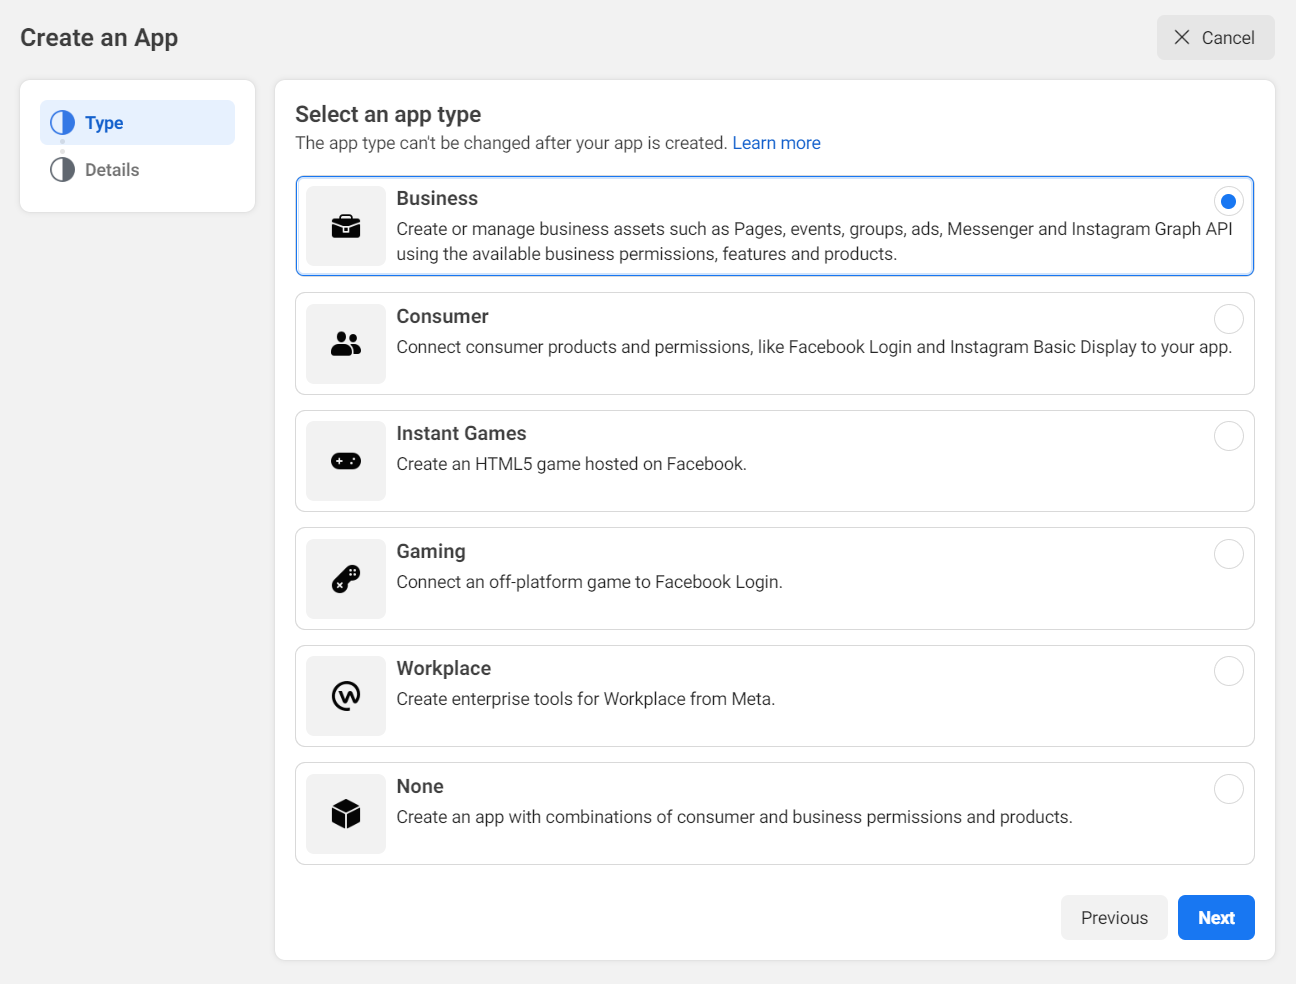
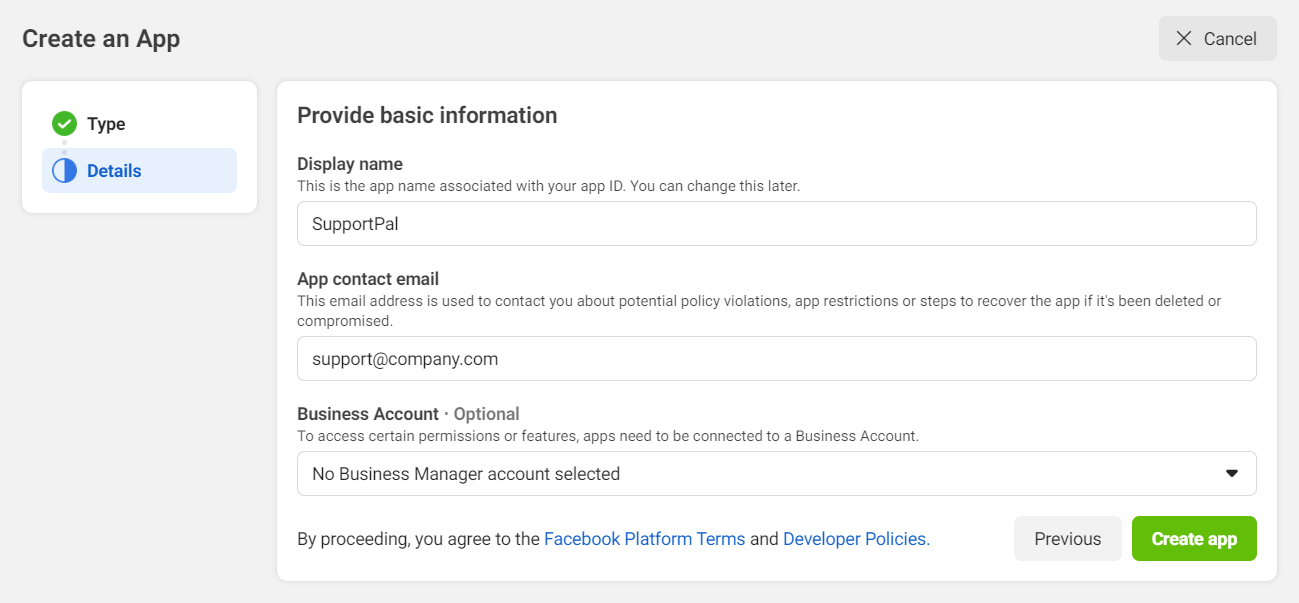
Select "Business" for the app type and continue. Next type in a name for the application, the name is not important, a contact email, and select "Yourself or your own business" as the app purpose, then finally click the "Create App" button.
-
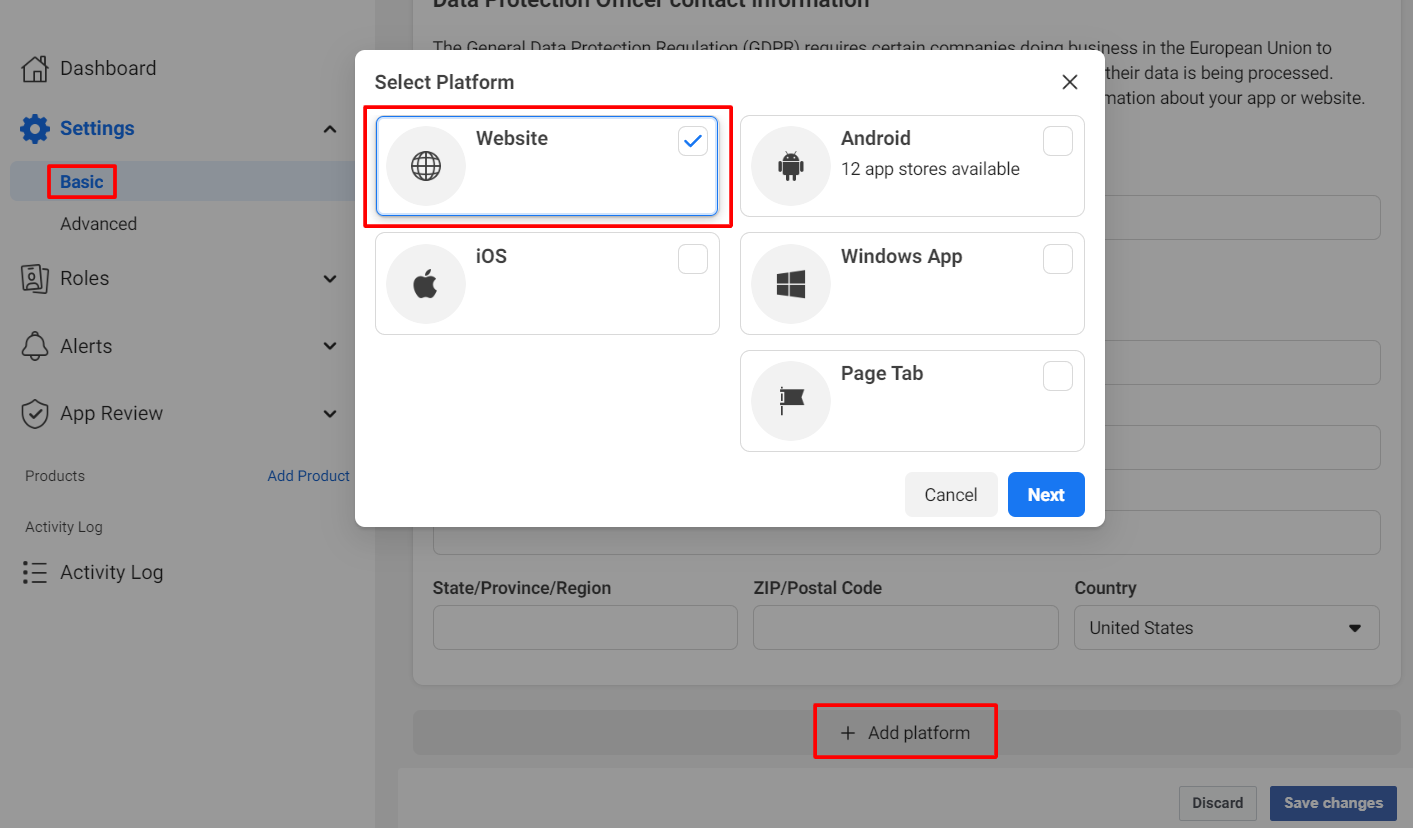
The screen will load with your new app. Click the "Settings" > "Basic" option in the sidebar, scroll to the bottom
of the page and click the large "+ Add Platform" button. Click the "Website" option.
-
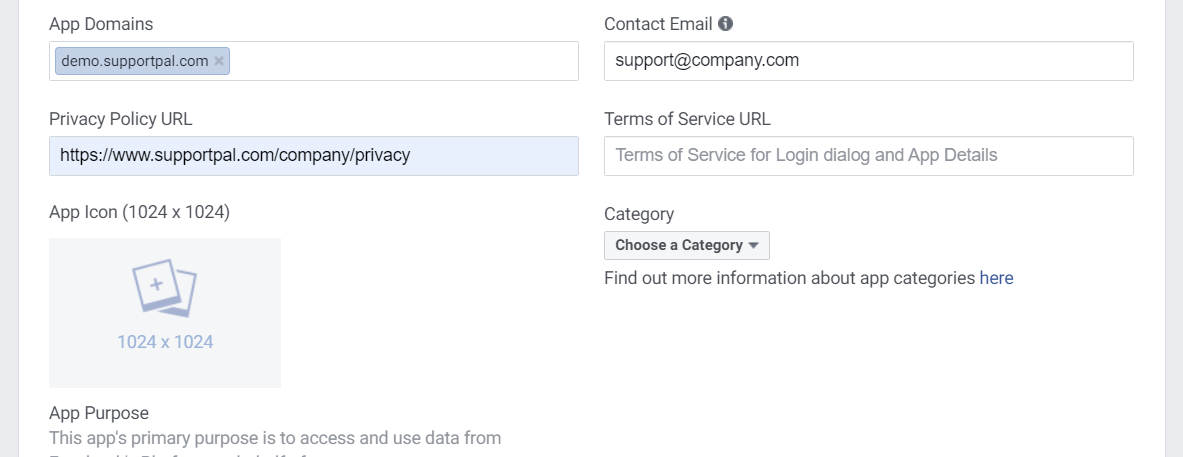
Enter the main domain for the help desk under "Site URL", and enter the same URL in the "App Domains" field above. You'll also need to set the privacy policy URL and an app icon to be able to complete the App Review later.

- Click "Save Changes".
-
Under "Products" in the sidebar click the "+" button. Look for "Facebook Login" and click on the "Set Up" button.

-
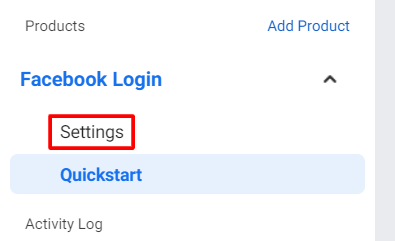
Click "Settings" in the sidebar under the "Facebook Login".
-
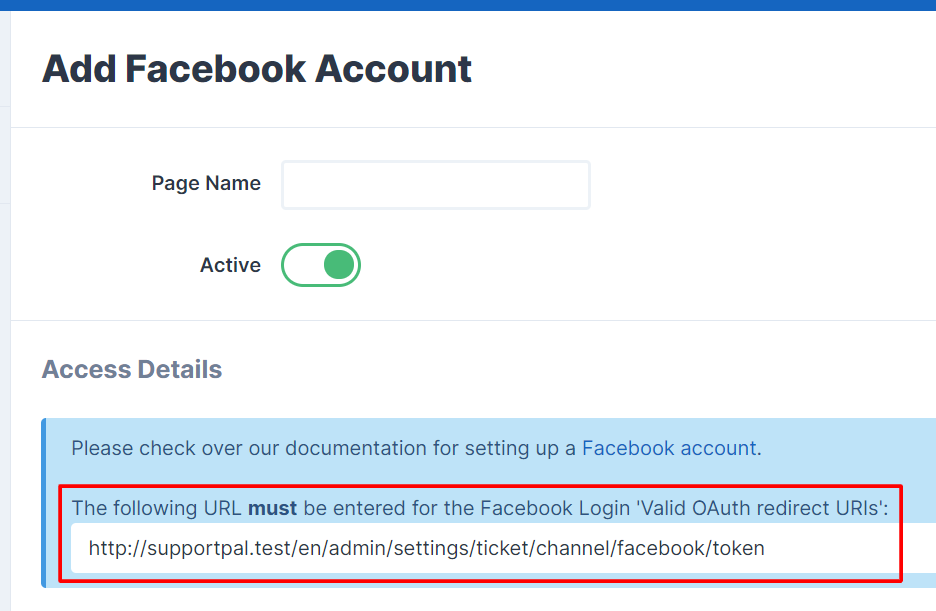
Under the "Valid OAuth Redirect URIs" section, enter the SupportPal callback URL. The URL can be found in your
SupportPal interface by browsing to Settings > Tickets > Channels > Facebook > Settings > Add Account.
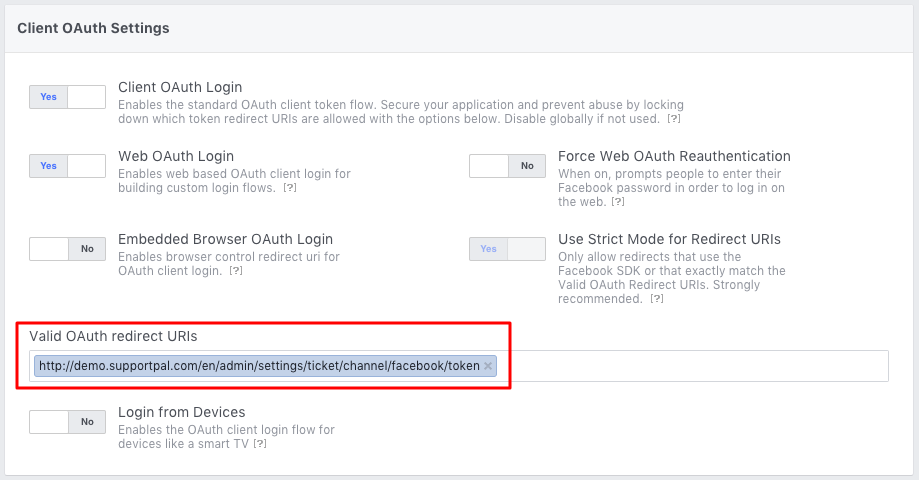
- Click "Save Changes".
SupportPal Setup
Now we've created a Facebook page and Facebook developer application, we need to link them to the helpdesk.- Visit Settings -> Tickets -> Channels in SupportPal and click on the "Settings" link on the Facebook channel row. If you're creating a new account click "Add Account", or if you're updating an existing account, search for it and click the edit (pencil) icon on the right side of the table row.
-
Complete the input fields:
- Page Name - Enter the page name.
- Active - If the account is active and should be included when polling for new posts and messages.
- Page ID - The page ID found on the "About" tab on the Facebook page.
- Application ID - The app ID found on the application page.
- Application Secret - The app secret found on the application page.
- Import From - Lets the ticket importing start from a specified date, for example set to today's date to avoid any old posts and messages being imported. This option is only available for new accounts.
- Import Posts - If it should convert wall posts or comments made to your Facebook page into tickets.
- Import Messages - If it should convert messages sent to your Facebook page into tickets.
- Default Department - Select the department in which messages sent to this account should be opened as tickets in.
- Default Priority - Select the priority with which tickets opened by this account are set as.
-
Once all the details have been entered, click the "Get Access Token" button, and you will be redirected to Facebook.
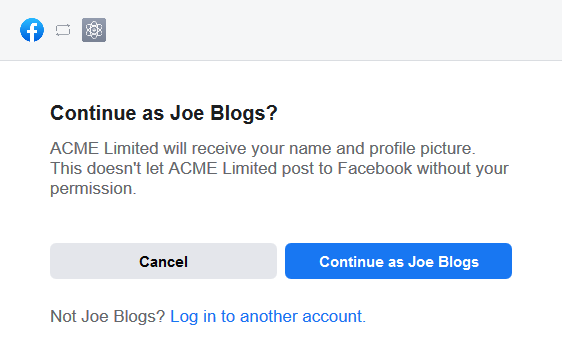
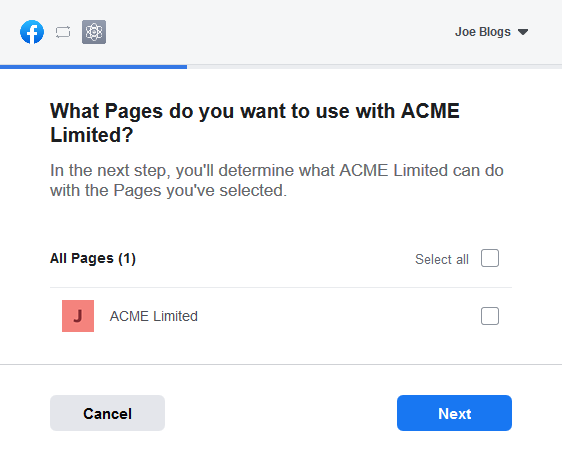
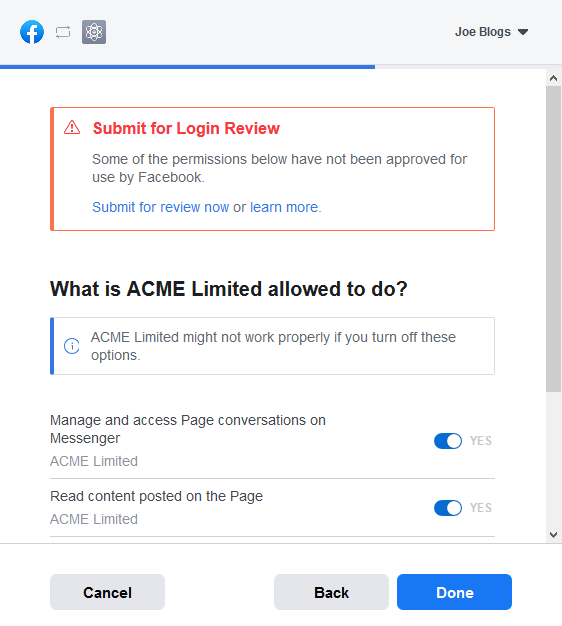
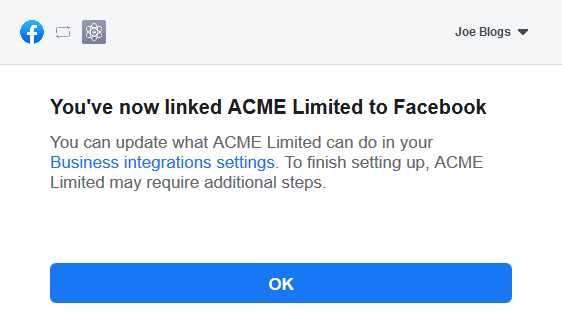
App RolesFollow through all the popups that are shown, which will just be making sure that you are allowing the application to post on the page's behalf. You will not have to change any of the permissions, simply press "OK" on each popup window as seen in the screenshots below.
Before clicking "Get Access Token" please ensure that your Facebook account is listed as an administrator or developer under "Roles" in the Facebook app dashboard. This allows you to request permissions without getting your app reviewed by Facebook.Information
Please disregard the big red "Submit for Login Review" message. We will do this next (see below).
Finally you will return to the help desk with an access token. - Click the "Submit" button to finish.
Facebook App Review
The app review must be done in two parts, the first to get permissions for posts sent to the page and the second for messages sent to the page. Both parts are needed to successfully use the channel.
Part 1: Posts
- Click "App Review" in the sidebar and then "Permissions and Features".
-
Search for and request advanced access to the following permissions:
pages_show_listpages_manage_engagementpages_manage_metadatapages_read_engagementpages_read_user_content
- Click "Continue the Request".
Complete App Verification
| Platform Settings |
|---|
|
Provide detailed step-by-step instructions on how a reviewer can test your integration and how you are using the requested permissions or features. Include any testing credentials required to access your integration.
My app doesn't use the Facebook Login dialog. My app or integration sits behind a local intranet. I am running help desk software by SupportPal (https://www.supportpal.com/). The software is used to converse with our customers via different social media platforms and email. It contains sensitive user data which we cannot expose to third parties such as Facebook. |
Requested Permissions and Features
Tell us how you'll use pages_show_list |
|---|
Please provide a detailed description of how your app uses the permission or feature requested, how it adds value for a person using your app, and why it's necessary for app functionality.
|
Provide a detailed step-by-step video walk through of how your app will use this permission or feature, so we can confirm it is used correctly and does not violate our policies.
|
Tell us how you'll use pages_manage_engagement |
|---|
Please provide a detailed description of how your app uses the permission or feature requested, how it adds value for a person using your app, and why it's necessary for app functionality.
|
Provide a detailed step-by-step video walk through of how your app will use this permission or feature, so we can confirm it is used correctly and does not violate our policies.
|
Tell us how you'll use pages_manage_metadata |
|---|
Please provide a detailed description of how your app uses the permission or feature requested, how it adds value for a person using your app, and why it's necessary for app functionality.
|
Provide a detailed step-by-step video walk through of how your app will use this permission or feature, so we can confirm it is used correctly and does not violate our policies.
|
Tell us how you'll use pages_read_engagement |
|---|
Please provide a detailed description of how your app uses the permission or feature requested, how it adds value for a person using your app, and why it's necessary for app functionality.
|
Provide a detailed step-by-step video walk through of how your app will use this permission or feature, so we can confirm it is used correctly and does not violate our policies.
|
Tell us how you'll use pages_read_user_content |
|---|
Please provide a detailed description of how your app uses the permission or feature requested, how it adds value for a person using your app, and why it's necessary for app functionality.
|
Provide a detailed step-by-step video walk through of how your app will use this permission or feature, so we can confirm it is used correctly and does not violate our policies.
|
Complete App Settings - Review your app settings
- Scroll down to "Complete App Settings" and click "Review your app settings". Fill out the remaining fields and click "Save".
- Finally, click the "Submit for Review" button.
Part 2: Messages
- Under "Products" in the sidebar click "Add Product". Hover over the Messenger option and click the "Set Up" button that appears.
- Scroll down to "Access Tokens", click on the "Add or Remove Pages" link. Follow the process and select the correct Facebook page.
- Scroll down to "App Review for Messenger" and click the "Add to Submission" button for "pages_messaging"
-
Under "Current Submission", click "Add details" and a popup will appear. Fill out the fields using the information provided below:
- Check I agree to Facebook's permission and feature usage guidelines.
-
Tell us about the use case(s) for your app will use the permission for
Involved business integration to support live chat by humans. -
Test and reproduce the functionality of your integration:
Select the Facebook page and fill in the textarea with the following:SupportPal is self-hosted help desk software which runs behind our local intranet to protect user data. We use it to converse with our customers over different social media platforms and email. This Facebook application is designed to only access our Facebook page and to ease management of replying to user generated messages. The SupportPal software uses the pages_messaging permission to access the /page-id/conversations end point. A periodic cron task fetches user generated page messages. It converts the users name, profile picture and message contents into a help desk ticket. The /page-id/messages end point is then used to post a reply back to the user via the help desk ticket. This functionality is only available to authenticated help desk staff. -
Show us how you're using this permission or feature
Screencast 2 Example - https://drive.google.com/file/d/10eIdW4H3961Po_VBefi_FthufIYME6Ga/view?usp=sharing
- Click "Submit For Review".
Delete an Account
To delete an account, follow the below steps:
- Visit Settings -> Tickets -> Channels and click on the "Settings" link on the Facebook channel row.
- Search for the account you wish to delete.
- Click the delete (cross) icon located on the right of the table.
- Click on the left button, "Yes, I'm sure", that pops up confirming you would like to delete this account, and it will then be deleted.
