Viewing Ticket
The ticket view provides a lot of information and available actions along with the option to view and reply to user messages.
Quick Actions
A number of quick action buttons can be found at the top of the page that will be carried out immediately.
- Take - Assign yourself to the ticket, replacing any current assignees on the ticket.
- Close - Sets the status to your default resolved status and then redirects back to the grid.
- Close & Lock - Sets the status to your default resolved status and prevents the user from replying again, finally redirecting back to the grid.
- Unlock - Unlocks the ticket to allow the user to reply again, the ticket status will remain as the default resolved status. Only visible when the ticket is currently locked.
- Watch/Unwatch - Watching the ticket means you will receive notifications (when set to be sent) for it regardless of your personal notification settings or if other operators are assigned to the ticket. The operator reply/note email notifications are dependent on the 'Send Email to Operator(s)' checkbox being checked when replying. Disabling any of the email templates in the department settings will prevent those email notifications being sent to watching operators too.
- Move to Trash - Move the ticket to the trash, where it will be automatically deleted after 30 days by default.
- Block User - Adds a spam rule for the user's email address so they cannot open further tickets and also moves the ticket to the trash.
If the ticket is currently in the trash, there will be two other actions shown instead.
- Restore - Remove the ticket from trash and back into the system. It will also unblock the user's email if they were blocked before.
- Delete Forever - Permanently deletes the ticket from the system, including the related data mentioned in the popup shown.
Replying
There are two available types when replying:
- Ticket Reply - A reply to the user, which will be visible by them when they view the ticket on the frontend.
- Ticket Note - An internal note for operators only, users will not be able to see it.
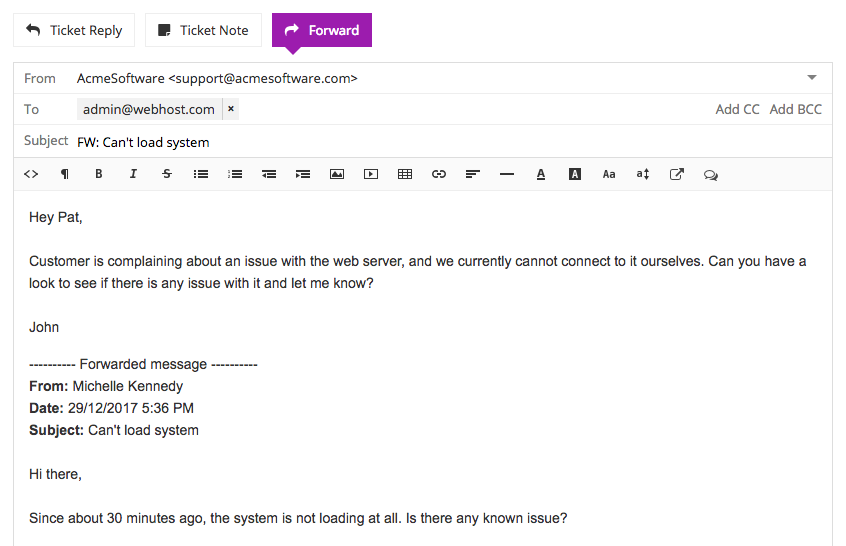
A third tab is available to forward the ticket to a third-party.
Drafts
When writing replies, it may be useful to safe drafts if you need to come back to the ticket in the future. Drafts can be saved (or updated) with the "Save Draft" button below the textarea, and can be discarded with the "Discard Draft" button. Automatic drafts are saved every minute.
Adding/Removing Contacts
DEV-1467 - Allow CC on Internal Tickets, please open a ticket to vote on this feature.
x button will not be visible).
Additional email addresses can be attached as contacts to the ticket, such that they will receive carbon copies (CC) of the emails sent to the ticket user. Click the "Add CC" option found on the right of the user's email address. Click in the white area in the newly showing CC row and type in the email address. The contact will only be saved when you post the reply.
On tickets with existing contacts, the option to either Reply All or Reply (without CC) will be available when writing your reply. The latter option will retain the contacts on the ticket but only email the addresses listed in the TO section.
Reply Options
A number of options are available that are carried out when the reply is posted:
- Send Email to User(s) - Email the reply to the user(s).
- Send Email to Operator(s) - Email the reply or note to operators so they are kept in the loop about the ticket.
- Go Back to Ticket Grid - Go back to the ticket grid after the reply has been posted.
- Take Ownership - Assign yourself to the ticket.
- Add to Canned Responses - Adds the current response as a canned response, with the option to make available for all operators or yourself only.
- Set Status - Changes the status of the ticket.
Add Canned Response
You can utilise a canned response by clicking the speech bubble icon as highlighted below in the text editor toolbar. This will allow you to search for canned responses, and will show the most commonly used or recent responses based on your ordering preference.

Add Self-Service Link
You can add a link to an article in your reply by clicking the icon as highlighted below in the text editor toolbar.

Attachments
Audio, image and video attachments can be previewed in the browser. Clicking on the attachment will open up a popup with a large version of the image or start playing the audio/video. The attachment can be downloaded by clicking the down arrow in the top right corner as shown below.
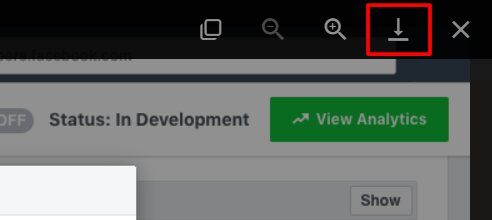
PDF files will attempt to open in the browser too. Other attachment types will automatically download on clicking.
Message Actions
Splitting Tickets
Sometimes users may reply to an existing ticket with a separate issue and it may be helpful to separate that response to a new ticket. By using the checkboxes on the top right side of each message, you can select which messages you wish to split and then click the "Split Selected Replies" option to the right of the tabs. You will then be automatically taken to the new ticket, and the two tickets will be linked together (see Linking Tickets).
Quoting Messages
You can quote whole messages by using the quote mark icon that can be found on the top right side of each message. Clicking this icon will copy the whole message to the textarea with ">" added in front of each line to signify that it is a quote.
Editing Messages
Messages can be modified by clicking the pencil icon, to save your changes click the "Save" button.
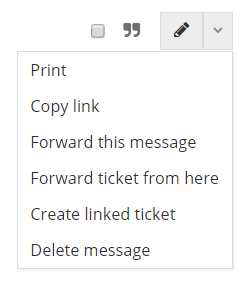
Printing
Use the 'Print' option to print an individual ticket reply.
Permalink
The 'Copy Link' option in the dropdown menu can be used to generate a permalink to the selected message. The link can then be sent to colleagues and the browser will automatically scroll to the selected message.
Forwarding
The 'Forward this message' option will populate the editor of the 'Forward' tab with the contents of the selected message.
The 'Forward ticket from here' option will populate the editor of the 'Forward' tab with the contents of the selected message and all prior messages. Note: operator notes and forwarded messages are excluded.
See Forward below for more information.
Linked Tickets
The 'Create linked ticket' option can be used to create a new linked ticket directly based on the selected message. The Open New Ticket form will be prefilled with the old ticket subject and the ticket message content, changes can be made as required before the new ticket is created.
See Linked Tickets below for more information.
Deleting Messages
Messages can be deleted by clicking the dropdown menu and selecting 'Delete Message'. Please note that if you delete the only message left it will also delete the whole ticket.
Editing the Subject
The subject name can be modified by clicking on it and updating the text field that shows. Once finished, clicking elsewhere on the screen will then update the subject in the system.
Sidebar
Below are the three key sections included in the ticket sidebar, though more sections may be available depending on the ticket channel.
Ticket Details
The relevant details and options available for the ticket, as listed below. These details are updated automatically regularly.
- Number - The ticket number.
- User - The user on the ticket, can be changed by clicking on their name (red dotted line) and searching for or creating a new user.
- Brand - The brand the ticket is in, can be changed by clicking on the name (red dotted line) and filling out the form that shows.
- Channel - The channel over which the ticket was opened.
- Department - The current department
- Status - The current status of the ticket.
- Priority - The current priority of the ticket. Updating the priority may update the due time on the ticket if an SLA plan is set.
- Tags - Any tags associated with the ticket currently, can be used to add new tags here.
- Assigned Operators - Any operators that are currently assigned to the ticket, can be used to assign other operators.
- SLA Plan - The SLA plan the ticket falls under, changing to another plan may update the due time.
- Due Time - The due time of the ticket, usually set by the SLA plan but can also be set or updated manually, even without an SLA plan, if needed by clicking on the underlined text and setting a new date and time. The due time can also be cleared by clicking on the underlined text and then clicking the trash icon.
- Last Action - The time since the last action that occurred on the ticket.
- Linked Tickets - Linked tickets allows you to quickly view associated tickets. To link tickets, click the + icon and a modal is shown which allows you to search by ticket number or subject.
User Details
A quick overview of the user is available here, along with their (up to) three most recent other tickets. If the user is in an organisation, you will also be able to see tickets from other organisation members separately.
Macros
A list of manual macros that can be applied on the ticket and perform a series of automatic actions.
Ticket Custom Fields
The custom fields available for the department are listed here, along with any data that the user or an operator has filled in for the ticket so far. The fields can be updated by changing the values as necessary and clicking the "Save" button.
Ticket Log
Clicking the "Log" tab will show a table of events related to this ticket only. The table can be sorted by clicking the up/down arrows:
- Down arrow: descending order
- Up arrow: ascending order
Escalation Rules
Clicking the "Escalation Rules" tab will show a table of scheduled escalation rules that are due to run in the future. The table will only show if the ticket has an SLA plan and there are escalations rules active. The table can be sorted by clicking the up/down arrows:
- Down arrow: descending order
- Up arrow: ascending order
Follow Up
Often you may wish to follow up on a ticket at a later date. You can use ticket follow ups to perform a series of actions automatically at a specific date and time. Follow the below steps to set up a ticket follow up.
- Click on the "Follow Up" tab on the ticket view.
- Choose if you wish the follow up to be at a specific date and time or whether to specify a time from from now (for example, 3 days from now). Enter the date/time as you need.
- You may wish to change the status of the ticket until the follow up is actioned, you can use the Set Status dropdown for this.
- Add actions that to be performed when the follow up time is reached, multiple actions can be added.
- Click "Save".
The follow up can be updated by updating the fields and clicking "Save" again, or removed by clicking the "Delete Follow Up" button.
Forward
As a business you may have third parties, such as suppliers or contractors, whom you have to contact based on the support requests you receive. Just click the tab and it will pre-fill the editor with the existing ticket content, similar to a regular email client. You can send the email to anyone, from either a department email or your own email address (so that it looks more personal), as well as edit the subject and contents. The forwarded message is shown in the ticket with a purple background allowing other operators to see it as well.