Plugin Development: Registering Settings
Previous Section: Views
SupportPal comes with a PluginSetting model that can be used to store any settings required for the plugin to operate.
Saving Settings
To save a single setting for the plugin, use the addSetting function.
$this->addSetting($key, $value);Removing Settings
To remove a single setting with a known key for the plugin, use the removeSetting function.
$this->removeSetting($key);To remove all settings for the plugin, for example when uninstalling the plugin, use the removeSettings function.
$this->removeSettings();Checking if a Setting Exists
If you need to just check if a setting currently exists, you can use the hasSetting function, which returns a Boolean. A second parameter can be entered for the setting value if you want to check the setting has a specific value.
    $this->hasSetting($key);
    $this->hasSetting($key, 'value');
To check if the plugin has any settings registered currently, you can use the hasSettings function, which returns a Boolean.
$this->hasSettings();Creating a Settings Page
You should now know what controllers, routes and views are, and we can piece this together to build a simple settings page for the plugin. First we need to set up the routes for the settings page, a GET route to display the page and a POST route to handle saving the updated settings. The routes should have a name defined and be set to use a specific action, which we'll add shortly.
    <?php

    Route::get('settings', [
        'as'   => 'plugin.helloworld.settings',
        'uses' => 'App\Plugins\HelloWorld\Controllers\HelloWorld@getSettingsPage'
    ]);

    Route::post('settings', [
        'as'   => 'plugin.helloworld.settings.update',
        'uses' => 'App\Plugins\HelloWorld\Controllers\HelloWorld@updateSettings'
    ]);
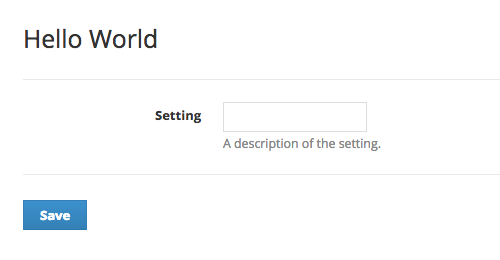
Next we need to create a view to show the settings page, which will contain a form that submits to the POST route. The form_* functions are made available thanks to the TwigBridge library, providing snake_cased versions of all the functions available from the Laravel Collective HTML package, but you can also use straight HTML if you prefer.
    {% extends 'operator.' ~ template ~ '.index' %}

    {% block title %}
        {{ Lang.get('HelloWorld::lang.hello_world') }}
    {% endblock %}

    {% block content %}
        {{ form_model(fields, { 'method': 'POST', 'route': [ 'plugin.helloworld.settings.update' ] }) }}

            <div class="form-container first">

                <div class="form-row">
                    {{ form_label('setting', Lang.get('HelloWorld::lang.setting')) }}
                    <div class="input-container">
                        {{ form_input('text', 'setting') }}<br />
                        <span class="description">{{ Lang.get('HelloWorld::lang.setting_desc') }}</span>
                    </div>
                </div>

            </div>

            <div class="form-button">
                {{ form_submit(Lang.get('general.save')) }}
            </div>

        {{ form_close() }}
    {% endblock %}
Breaking the template down, the form_model call will create the initial <form> tag and sets the action and method, and the first attribute 'fields' should be an array containing any data that is currently set for the fields in the form. The form_input adds an input field with the name 'setting' to the form. The form_submit adds a button allowing to submit the form and form_close is needed at the end to close the form.
Finally we add our two actions, for displaying the settings page and updating the settings:
    /**
     * Get the settings page
     *
     * @return \Illuminate\View\View
     */
    public function getSettingsPage()
    {
        return \TemplateView::other('HelloWorld::settings')
            ->with('fields', $this->getSettings());
    }

    /**
     * Update the settings
     *
     * @return \Illuminate\Http\RedirectResponse
     */
    public function updateSettings()
    {
        // Get module id
        $data = \Input::all([ 'setting' ]);

        try {
            // Work through each row of data
            foreach ($data as $key => $value) {
                if (!empty($value) || $value == 0) {
                    $this->addSetting($key, $value);
                }
            }

            // All done, return with a success message
            \Session::flash('success', Lang::get('messages.success_settings'));
        } catch (\Exception $e) {
            // Return with a success message
            \Session::flash('error', Lang::get('messages.error_settings'));
        }

        return \Redirect::back();
    }
The TemplateView::other method lets us display plugin templates, and we can pass data to the view with the with() helper. We will also fetch our current settings by using the getSettings function and use it to show the existing values when displaying our settings page.
The Input facade gives us access to data in the request, we use the only method to limit what data we fetch from the request, in this case only the 'setting' field. We add our settings provided they're present and not an empty string. Finally we show a success or error message depending on the success of saving the settings, flash will mean it only shows for one request, and redirect back to displaying the settings page.
The settings page now works, but we want to make it easier for operator to manage the plugin, which we can achieve by making it show a settings link in the plugins grid. We do this by calling the registerSetting function in the controller constructor and setting it to the GET route we created.
    /**
     * Initialise the plugin
     */
    public function __construct()
    {
        parent::__construct();

        $this->setIdentifier('HelloWorld');

        // Register the settings page
        $this->registerSetting('plugin.helloworld.settings');
    }
Now you have a functioning plugin with a settings page, and you're ready to make it more useful.
