
Plugin Development: Getting Started
Learn about what a plugin is, a plugin's basic structure and how to initially configure your own plugin.
What is a Plugin?
A plugin lets you add an individual bit of functionality or allows modifying data that is being handled by the system. Some examples of what you can do with plugins:
- Sending notifications to your Slack channel on ticket actions.
- Connecting to your billing system and displaying the user's products in the ticket view.
- Adding useful actions based on the submitted ticket custom field values.
All plugins belong within the /addons/Plugins directory, each with its own directory that is named the same as the plugin name. Each plugin usually has the following basic file structure:
| File/Folder | Description |
|---|---|
config.php |
The configuration file for the plugin, where you set the name, version and other important details about the plugin that shows in the operator panel when activating the plugin for the first time. |
composer.json |
If you need to use any libraries in your plugin, you can install them using composer by declaring them in this file and running composer install in the plugin folder. The plugin initialisation code checks for the presence of vendor/autoload.php to automatically load any dependencies that you use.
Disable prepend-autoloader
The prepend autoloader feature should be disabled to ensure the system works correctly. By default, the plugin dependencies would be loaded before the core system dependencies, which overrides them. Therefore, your composer.json config should include the prepend-autoloader option set to false: |
Controllers/ |
Controllers are where the main logic of your plugin is stored. Your plugin must have a class with the same name as the plugin in this folder, which is used to initialise the plugin. |
Lang/ |
If you wish to support multiple languages, you can store the translations in this folder. |
Listeners/ |
Any event listeners, template hooks and view composers should be stored in this folder. |
Requests/ |
Form request validation can be stored in this folder, used to validate data that is sent in a request before it is made available to the controller action. |
Routes/ |
Any additional routes are declared in files in this folder, for example a GET and POST route for the plugin settings page. |
Views/ |
Any templates used by the plugin are stored in this folder, for example for displaying the plugin settings page. |
vendor/ |
Any libraries installed via composer will be placed in this folder. |
Choosing a Name
Each plugin must have its own unique name for it to function alongside the other plugins active in the system. The name you use must have a capitalised letter for each word with no spaces, such as HelloWorld and ThisIsMyPlugin.
Starting with the Make Command
We recommend to use the included make:plugin command to generate the initial codebase for your own plugin. The command can be run on the CLI (in the base SupportPal directory) by entering php artisan make:plugin. It will then show a number of options that must be configured, which are explained in more detail below.
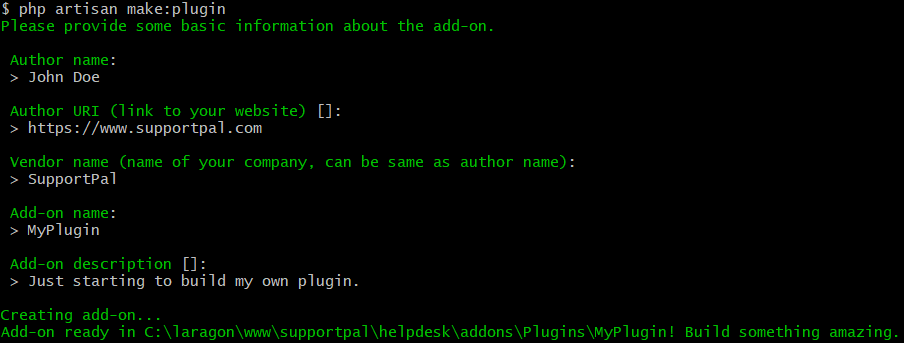
| Setting | Description |
|---|---|
| Author Name | Include your or your company's name here. |
| Author URI | Include a link to your website here. |
| Vendor Name | The name of your company, can be the same as the author name. |
| Add-on Name | Set the name of the plugin, it must be unique and contain no spaces as described in the Choosing a Name section. |
| Add-on Description | A quick description of what the plugin will achieve, is shown to operators in the plugin grid when they are going to activate/manage plugins. |
Once you finish running through the options, it will automatically create the plugin in the filesystem. You will now be able to see it on the Plugins page (Add-ons -> Plugins) in the operator panel.

Configuration Options
The values you enter for the options above will be automatically inserted to the generated config.php file under your report folder. There are a few more configuration options available that you may wish to edit:
| Setting | Description |
|---|---|
| Name | Set the user-friendly name for the report. For example, for the HelloWorld plugin, this would be set to "Hello World". |
| Plugin URI | If you are developing this plugin to be distributed to other users, you may include a specific link about the plugin from your website. This is particularly useful if you will have a specific page and/or documentation on your website. |
| Version | Set the version of the plugin, such as '1.2.0'. |
| Icon | Set an icon to be displayed in the plugins list. It must be a full file path, we recommend to use __DIR__ to avoid hard coding the plugin directory name. If no icon is set, it will generate an icon based on the first letter in the name. |
| Supports | A version constraint to specify which versions of the help desk the addon is compatible with. If developing a new plugin, we recommend setting to this to be equal or greater than the current SupportPal minor version, such as >=5.5.0. |
Debugging Errors
To help with debugging while developing your plugin, we recommend the following settings. In the operator panel, please go to Settings and click the Debug tab:
- Enable the Debug Mode option. This will display errors in the browser in a user-friendly format.
You can also check the application log for errors, which can be found at /storage/logs/supportpal-[date].log on the file system or at Utilities -> Logs -> Log File Manager in the operator panel.