You're browsing the documentation for an old version of SupportPal. Consider upgrading to the [latest version](https://docs.supportpal.com/current/Saml+Authentication+Microsoft+365). 

# SAML Authentication: Microsoft 365

Setting up SAML authentication in Microsoft 365 requires use of Azure Active Directory.

## Azure Active Directory Set Up

1. Go to the [Microsoft 365 Admin console](https://admin.microsoft.com/) and log in with an admin account.
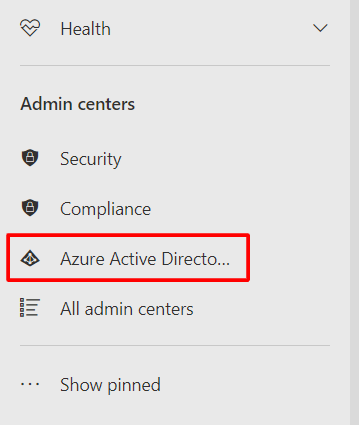
2. Click on 'Show all' in the sidebar, and then on 'Azure Active Directory'.  
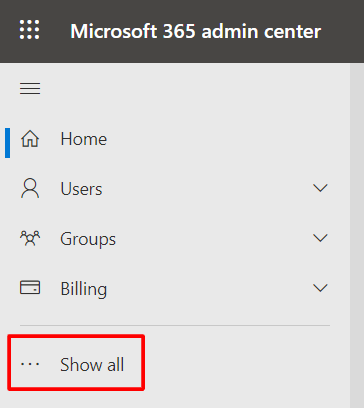
     <a class="lightbox" data-src="https://docs.supportpal.com/build/assets/microsoft-365-1-D6O3csC6.png"> ![Microsoft 365 - Azure Active Directory](https://docs.supportpal.com/build/assets/microsoft-365-1-D6O3csC6.png) </a>  
     <a class="lightbox" data-src="https://docs.supportpal.com/build/assets/microsoft-365-2-cdK2yf3u.png"> ![Microsoft 365 - Azure Active Directory](https://docs.supportpal.com/build/assets/microsoft-365-2-cdK2yf3u.png) </a>
3. The Azure Active Directory admin center will show. Click on your company name in the dashboard.  
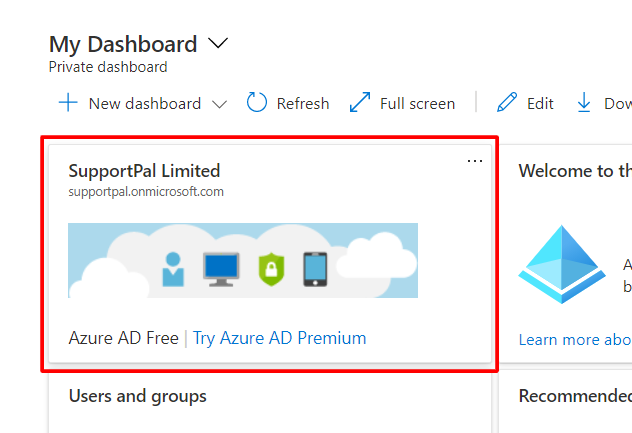
     <a class="lightbox" data-src="https://docs.supportpal.com/build/assets/microsoft-365-3-CJ2cKfJO.png"> ![Microsoft 365 - Azure Active Directory](https://docs.supportpal.com/build/assets/microsoft-365-3-CJ2cKfJO.png) </a>
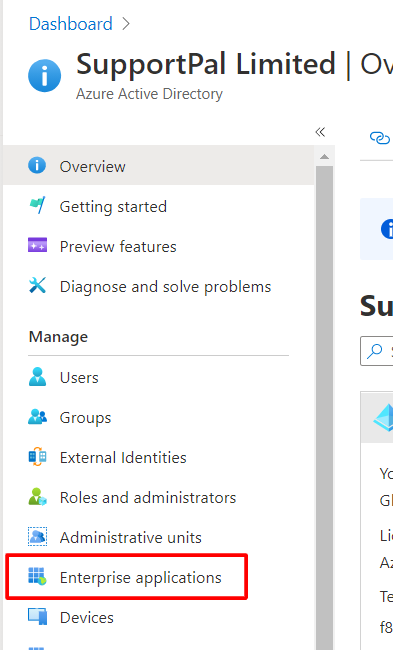
4. Click on 'Enterprise applications' in the sidebar.  
     <a class="lightbox" data-src="https://docs.supportpal.com/build/assets/microsoft-365-4-lDUYwRcE.png"> ![Microsoft 365 - Enterprise Applications](https://docs.supportpal.com/build/assets/microsoft-365-4-lDUYwRcE.png) </a>
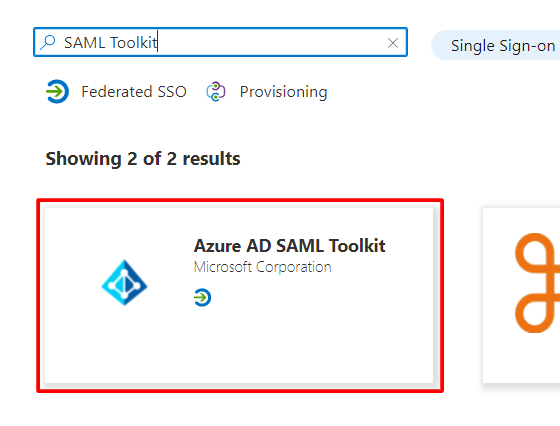
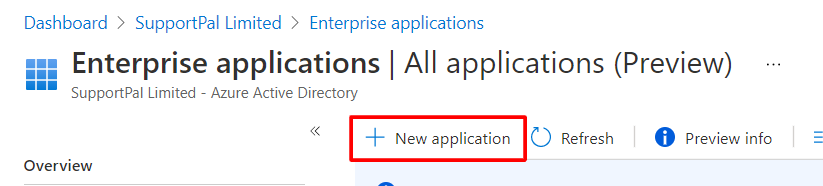
5. Click 'New application', type 'SAML toolkit' in the search, and select 'Azure AD SAML Toolkit'.  
     <a class="lightbox" data-src="https://docs.supportpal.com/build/assets/microsoft-365-5-9kCe8PZZ.png"> ![Microsoft 365 - New Application](https://docs.supportpal.com/build/assets/microsoft-365-5-9kCe8PZZ.png) </a>  
     <a class="lightbox" data-src="https://docs.supportpal.com/build/assets/microsoft-365-6-C1ktgJcv.png"> ![Microsoft 365 - Azure AD SAML Toolkit](https://docs.supportpal.com/build/assets/microsoft-365-6-C1ktgJcv.png) </a>
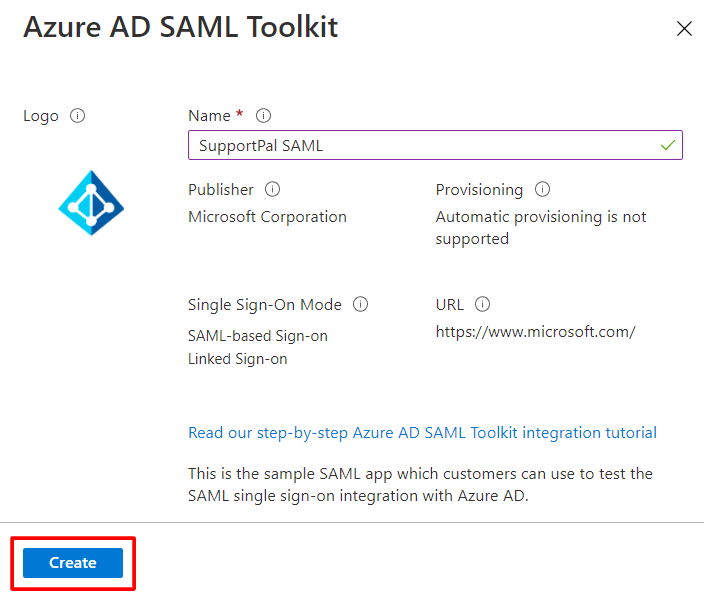
6. Set the name to 'SupportPal SAML' and click 'Create'. Wait until the page reloads and the application has been created.  
     <a class="lightbox" data-src="https://docs.supportpal.com/build/assets/microsoft-365-7-BxBS6aEN.png"> ![Microsoft 365 - Azure AD SAML Toolkit](https://docs.supportpal.com/build/assets/microsoft-365-7-BxBS6aEN.png) </a>
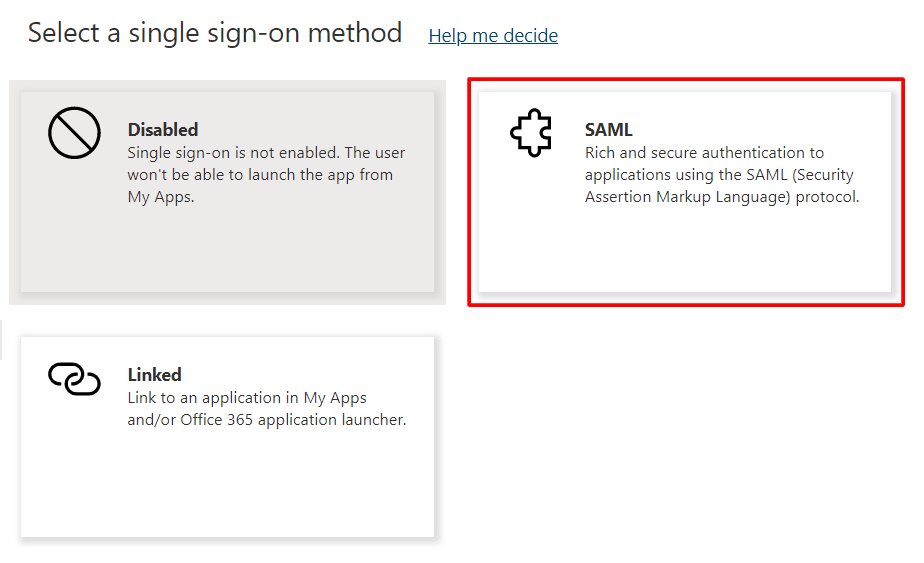
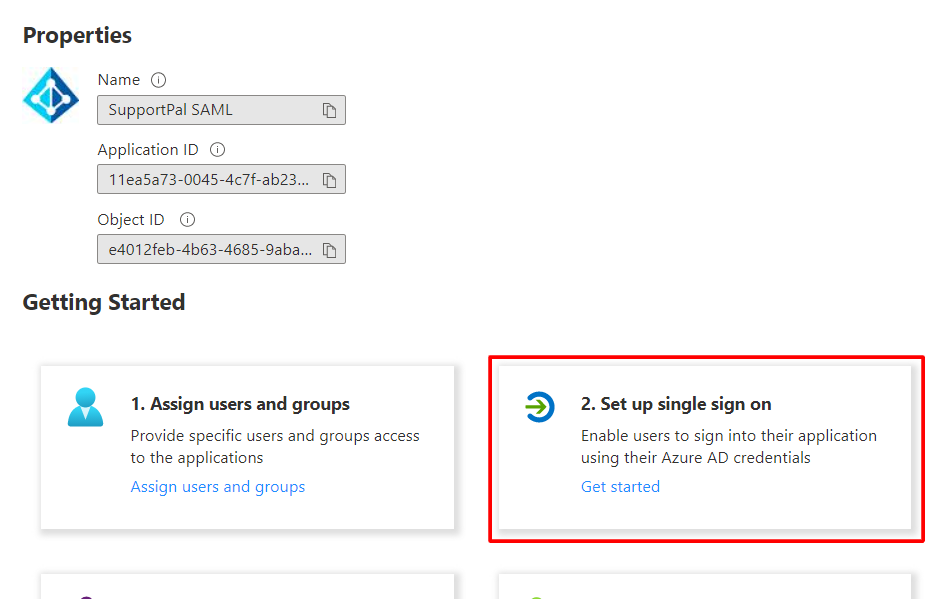
7. Click on the 'Set up single sign on' and choose the 'SAML' option.  
     <a class="lightbox" data-src="https://docs.supportpal.com/build/assets/microsoft-365-8-DqrPPS8h.png"> ![Microsoft 365 - Set Up Single Sign On](https://docs.supportpal.com/build/assets/microsoft-365-8-DqrPPS8h.png) </a>  
     <a class="lightbox" data-src="https://docs.supportpal.com/build/assets/microsoft-365-9-DQANNPKU.png"> ![Microsoft 365 - SAML](https://docs.supportpal.com/build/assets/microsoft-365-9-DQANNPKU.png) </a>
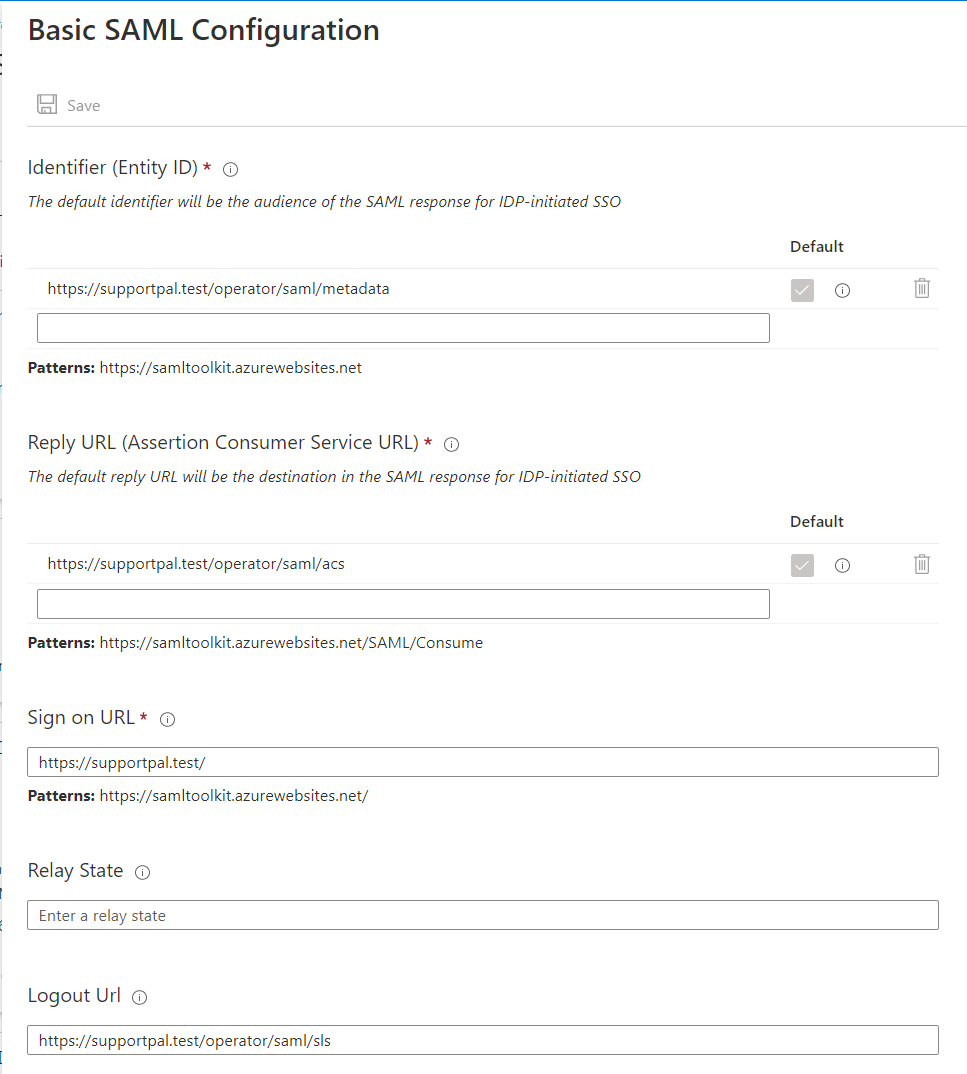
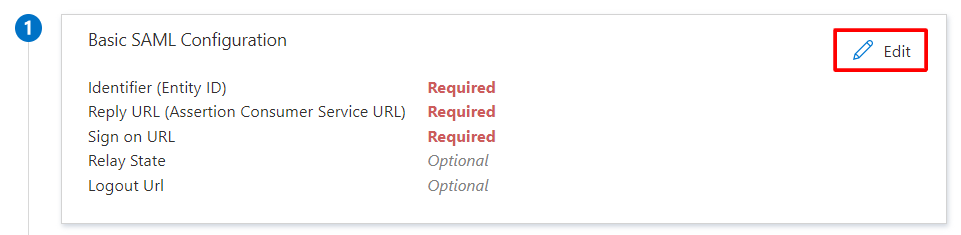
8. Click 'Edit' in the Basic SAML Configuration area. Set the text boxes like shown and set the relevant options as default, replacing the start of the URL with your help desk URL. To use this on the frontend (for users), replace 'operator' with 'frontend'. Click 'Save' once all the fields have been set.  
     <a class="lightbox" data-src="https://docs.supportpal.com/build/assets/microsoft-365-10-CiBJYMUE.png"> ![Microsoft 365 - Basic SAML Configuration](https://docs.supportpal.com/build/assets/microsoft-365-10-CiBJYMUE.png) </a>  
     <a class="lightbox" data-src="https://docs.supportpal.com/build/assets/microsoft-365-11-vT466ho4.png"> ![Microsoft 365 - Basic SAML Configuration](https://docs.supportpal.com/build/assets/microsoft-365-11-vT466ho4.png) </a>  If you have more than one brand in SupportPal, and users access the helpdesk using different URLs, you will have to set the relevant URLs for each brand individually.
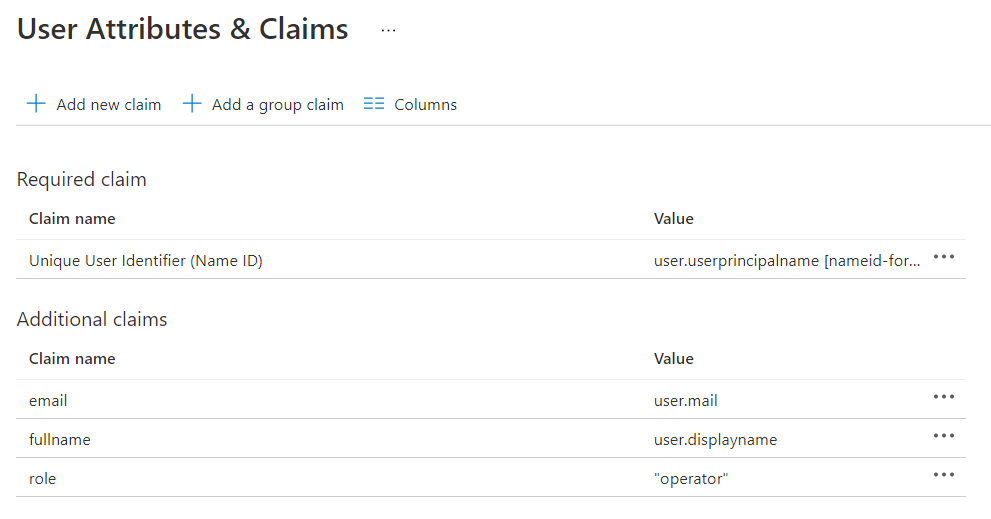
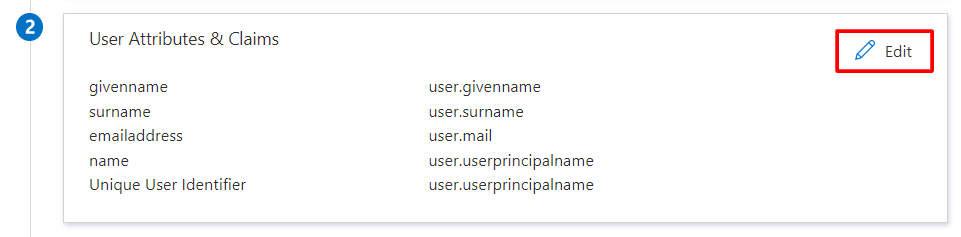
9. Next click 'Edit' in the User Attributes & Claims area. Delete the existing claims and create new claims like shown. The 'role' claim can be ignored if using on the frontend, and additional claims can be configured as per our [documentation](SAML+Authentication#AutomaticallyCreatingAccounts).  
     <a class="lightbox" data-src="https://docs.supportpal.com/build/assets/microsoft-365-12-DASWdwDd.png"> ![Microsoft 365 - User Attributes & Claims](https://docs.supportpal.com/build/assets/microsoft-365-12-DASWdwDd.png) </a>  
     <a class="lightbox" data-src="https://docs.supportpal.com/build/assets/microsoft-365-13-WYACq-X2.png"> ![Microsoft 365 - User Attributes & Claims](https://docs.supportpal.com/build/assets/microsoft-365-13-WYACq-X2.png) </a>
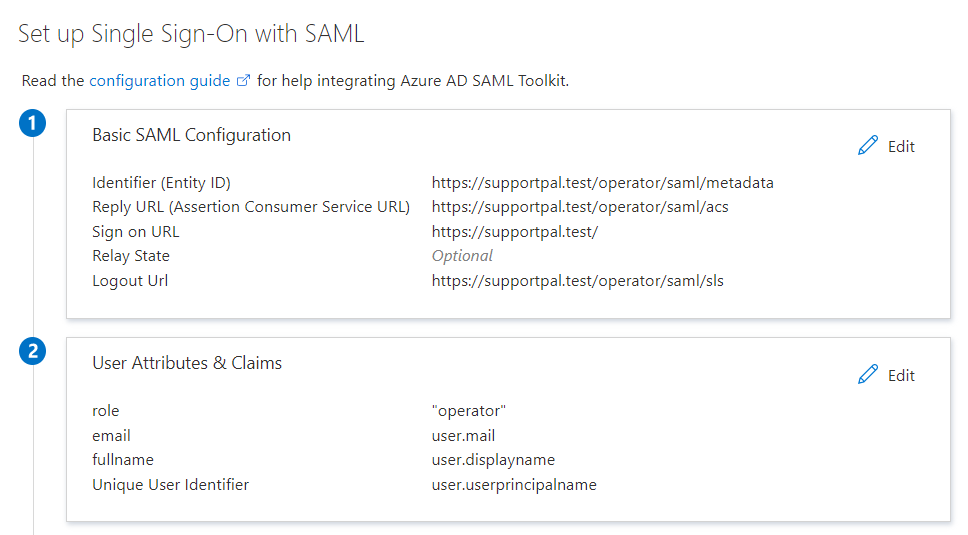
10. Once all that is done, your configuration should look like this:  
     <a class="lightbox" data-src="https://docs.supportpal.com/build/assets/microsoft-365-14-CVNtSqoj.png"> ![Microsoft 365 - SAML Configuration](https://docs.supportpal.com/build/assets/microsoft-365-14-CVNtSqoj.png) </a>
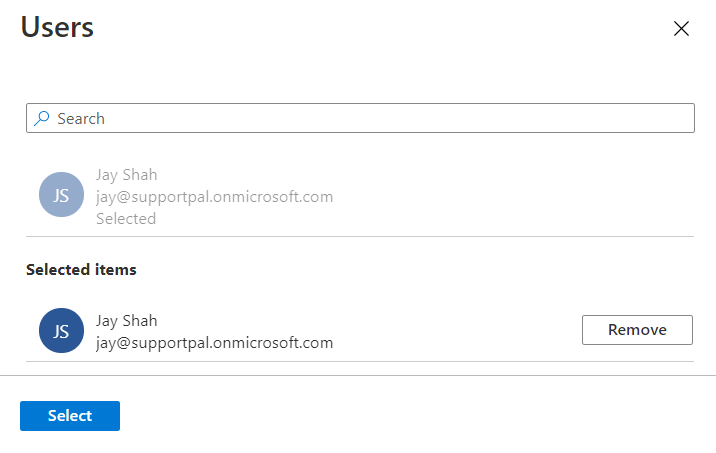
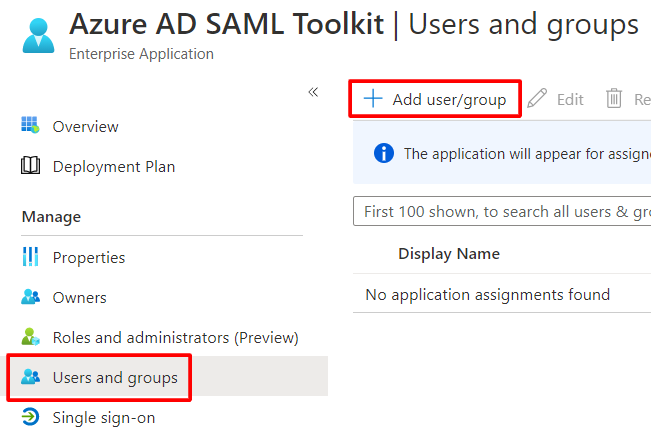
11. Finally, click 'Users and groups' in the sidebar, then click 'Add user/group'. Select all users that you would like to be able to login using SAML, leaving the role as 'Default Access', and click 'Assign'.  
     <a class="lightbox" data-src="https://docs.supportpal.com/build/assets/microsoft-365-15-mISu9h8I.png"> ![Microsoft 365 - Users and Groups](https://docs.supportpal.com/build/assets/microsoft-365-15-mISu9h8I.png) </a>  
     <a class="lightbox" data-src="https://docs.supportpal.com/build/assets/microsoft-365-16-EpwoMXOo.png"> ![Microsoft 365 - Users](https://docs.supportpal.com/build/assets/microsoft-365-16-EpwoMXOo.png) </a>

## SupportPal Configuration

1. Create the file `/config/production/saml.php` in your SupportPal installation as below.  config/production/saml.php  Expand  Collapse 
    
     ```
    
    <?php
    
    use App\Modules\User\Controllers\Saml\SamlAuthManager;
    
    return [
    
        /*
         |----------------------------------------------------------------
         | Strict Mode
         |----------------------------------------------------------------
         |
         | If 'strict' is True, then the PHP Toolkit will reject unsigned
         | or unencrypted messages if it expects them signed or encrypted
         | Also will reject the messages if not strictly follow the SAML
         | standard: Destination, NameId, Conditions ... are validated too.
         |
         */
    
        'strict' => true,
    
        /*
         |--------------------------------------------------------------------------
         | SAML Manager
         |--------------------------------------------------------------------------
         |
         | Define different SAML authentication settings for the frontend and
         | operator panels. Defining an IdP will enable SAML for the respective
         | panel.
         |
         */
    
        'guards' => [
    
            SamlAuthManager::OPERATOR_GUARD => [
    
                // Indicates how the parameters will be retrieved from the sls request for signature validation
                'retrieveParametersFromServer' => true,
    
                // Whether to allow users to login via both SupportPal and IdP, or
                // only via the IdP.
                'dualLogin' => true,
    
                // Identity Provider Data that we want connect with our SP
                'idp' => [
                    // The name of the identity provider, shown on the interface as
                    // 'log in via :name'.
                    'name' => 'Microsoft 365',
    
                    // Identifier of the IdP entity  (must be a URI)
                    'entityId' => '...',
    
                    // SSO endpoint info of the IdP. (Authentication Request protocol)
                    'singleSignOnService' => [
                        'url' => '...',
                    ],
    
                    // SLO endpoint info of the IdP.
                    'singleLogoutService' => [
                        'url' => '...',
                    ],
    
                    // Public x509 certificate of the IdP
                    'x509cert' => '...',
                ],
    
                'security' => [
                    // Indicates whether the <samlp:logoutrequest> messages sent by this SP
                    // will be signed.
                    'logoutRequestSigned' => true,
    
                    // Algorithm that the toolkit will use on signing process. Options:
                    //    'http://www.w3.org/2000/09/xmldsig#rsa-sha1'
                    //    'http://www.w3.org/2000/09/xmldsig#dsa-sha1'
                    //    'http://www.w3.org/2001/04/xmldsig-more#rsa-sha256'
                    //    'http://www.w3.org/2001/04/xmldsig-more#rsa-sha384'
                    //    'http://www.w3.org/2001/04/xmldsig-more#rsa-sha512'
                    'signatureAlgorithm' => 'http://www.w3.org/2001/04/xmldsig-more#rsa-sha256',
    
                    // ADFS URL-Encodes SAML data as lowercase, and the toolkit by default uses
                    // uppercase. Turn it True for ADFS compatibility on signature verification
                    'lowercaseUrlencoding' => true,
                ],
    
                'sp' => [
                    'x509cert' => 'X_PASTE_SUPPORTPAL_SIGNING_CERT_HERE',
                    'privateKey' => 'X_PASTE_SUPPORTPAL_SIGNING_CERT_PKEY_HERE',
                ],
            ],
    
        ],
    
    ];
    </samlp:logoutrequest>
    ```
    
     If you wish to use it on the frontend, you can change the file as per our [documentation](SAML+Authentication#EnablingSAML).
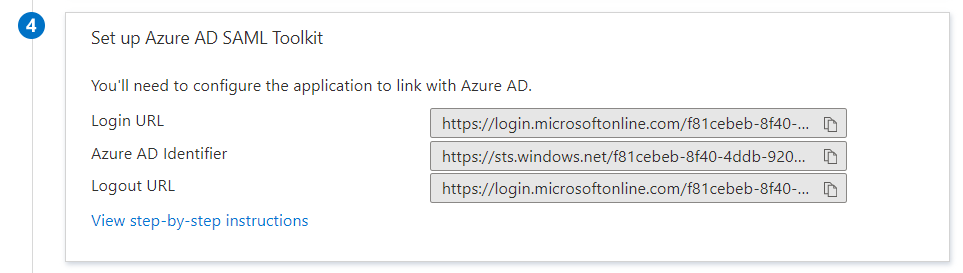
2. Update the `'idp'` configuration in `config/production/saml.php` using the details from the 'Set up Azure AD SAML Toolkit' section:  
     <a class="lightbox" data-src="https://docs.supportpal.com/build/assets/microsoft-365-17-BYKLSbne.png"> ![Microsoft 365 - SAML Configuration](https://docs.supportpal.com/build/assets/microsoft-365-17-BYKLSbne.png) </a>
    - For the `entityID` value, use the `Azure AD Identifier` value.
    - For the `singleSignOnService` value, use the `Login URL` value.
    - For the `singleLogoutService` value, use the `Logout URL` value.
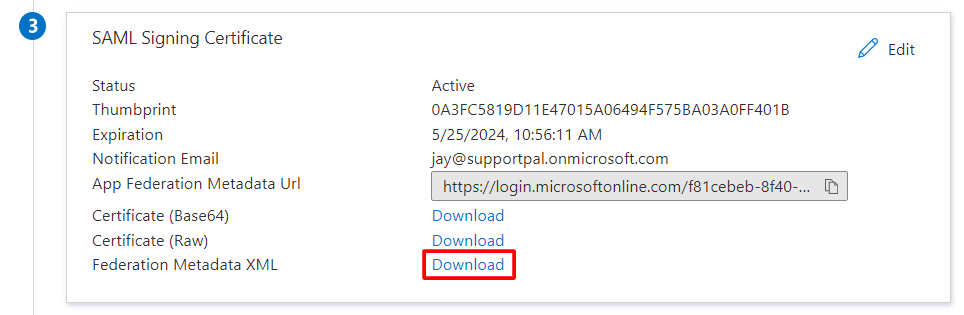
     
     <a class="lightbox" data-src="https://docs.supportpal.com/build/assets/microsoft-365-18-vvmhpPK2.png"> ![Microsoft 365 - SAML Signing Certificate](https://docs.supportpal.com/build/assets/microsoft-365-18-vvmhpPK2.png) </a>  
     For the `x509cert` value, download the Federation Metadata XML and copy the value of the `X509Certificate` from this file.
3. Create a signing certificate for SupportPal using `openssl`: ```
    openssl req -x509 -nodes -sha256 -days 730 -newkey rsa:2048 -keyout samlcert.key -out samlcert.pem
    ```
4. Update `config/production/saml.php`: 
    - Replace `X_PASTE_SUPPORTPAL_SIGNING_CERT_HERE` with the contents of `samlcert.pem`
    - Replace `X_PASTE_SUPPORTPAL_SIGNING_CERT_PKEY_HERE` with the contents of `samlcert.key`
5. The configuration is complete - verify by logging in with the 'Microsoft 365' button as a user that you assigned earlier to the application.
6. To force use of SAML over the normal login, change the `dualLogin` value to `false`.