You're browsing the documentation for an old version of SupportPal. Consider upgrading to the [latest version](https://docs.supportpal.com/current/Facebook+Channel).
# Facebook Channel
The Facebook channel can handle multiple accounts and will create tickets on new posts on your Facebook page and messages to the page.
## Activate or Deactivate Channel
The Facebook channel is disabled by default and needs to be activated before use. To do this, go to **Settings -> Tickets -> Channels** and click the "Activate" link on the Facebook channel row. The channel can be deactivated in the same way, instead this time by clicking the "Deactivate" link on the same row.
## Step-by-Step Guide
### Prerequisites
**HTTPS required!**
Your help desk must have HTTPS enabled in order for the Facebook Integration to work.
As part of **App Review**, Facebook request that you provide a login to the software so that they can test the step-by-step instructions and verify the contents of the video (see [https://developers.facebook.com/docs/apps/review/faqs#faq\_166560497060278](https://developers.facebook.com/docs/apps/review/faqs#faq_166560497060278)). In order to prevent Facebook from accessing more required, we recommend the following configuration:
1. Create a new Operator Role with the following permissions:
`Manage Scheduled Tasks`, `View Tickets`, `Open Tickets`, `Update Tickets`, `Delete Tickets`
2. Create a new Operator Group and assign it to all brands, and the role created above.
3. Create a new Operator and assign it to the above group, do not set any departments.
4. Create a new Department, assign it to all brands, turn off the Public setting, and assign the operator group created above.
### Create Facebook Page & App
To set up a Facebook page to work with the help desk, you need to set up an application with the right permissions, follow the steps below.
1. Login to Facebook.
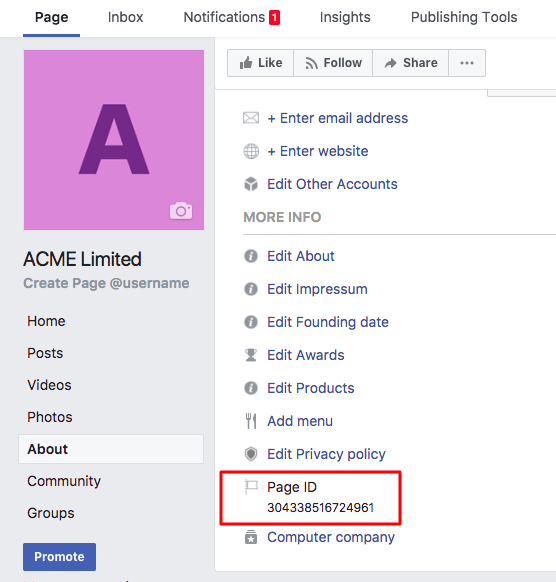
2. If you do not currently have a Facebook page for your company, please [create a page](http://www.facebook.com/pages/create.php) and keep a note of the page ID. If you already have a Facebook page, you can get the page ID by clicking the "About" link in the sidebar, and scrolling down to the "Page ID" row. Your page **must** be published (publicly visible) for the integration to work.
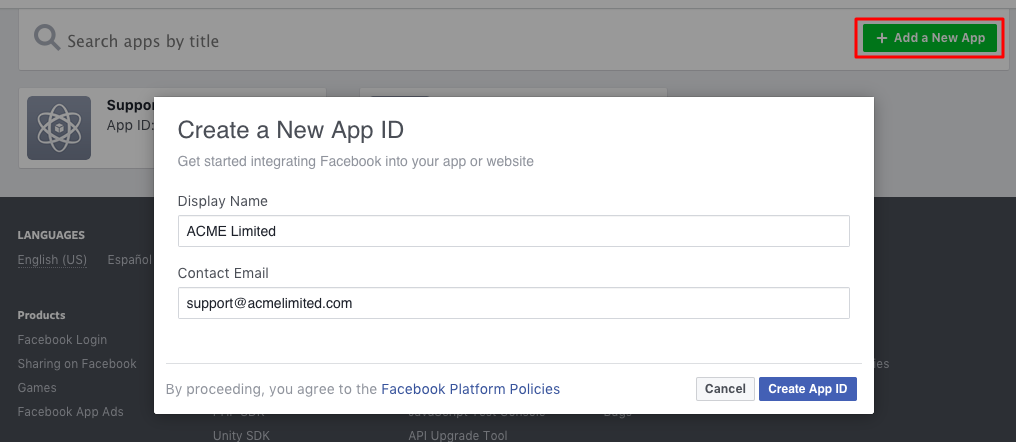
3. Visit the applications page on the Facebook developers website - - and click the "Add a New App" button.
4. Type in a name for the application, the name is not important, and click the "Create New Facebook App ID" button.
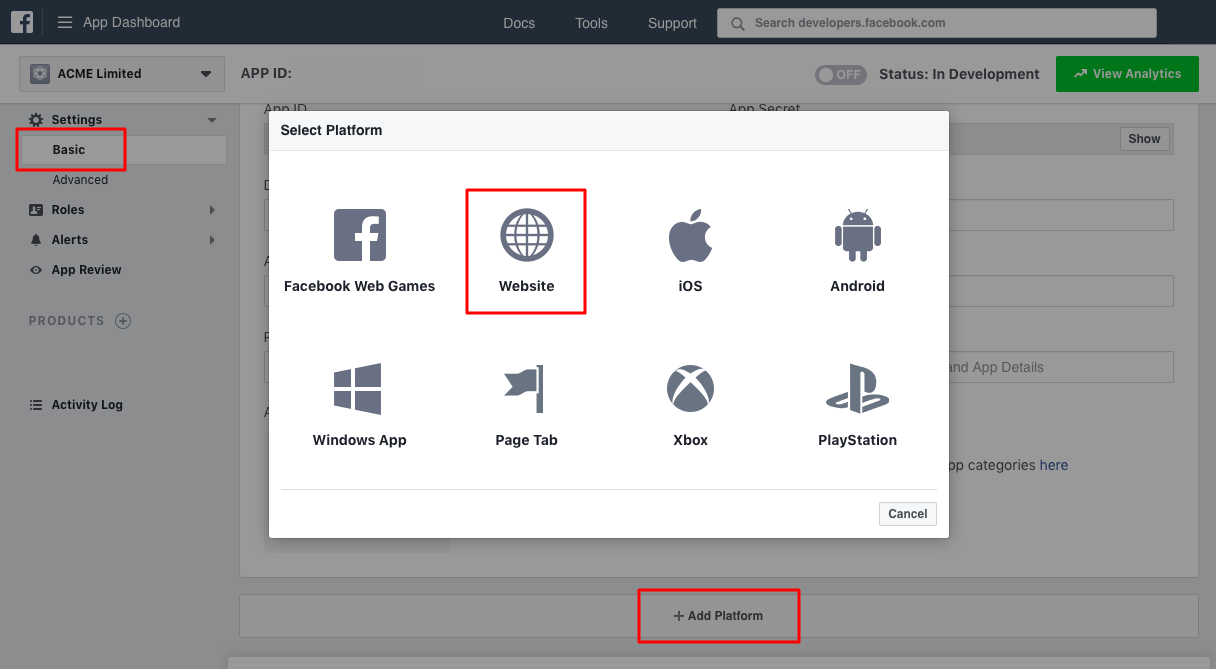
5. The screen will load with your new app. Click the "Settings" option in the sidebar and click the large "Add Platform" button. Click the "Website" option.
6. Enter the main domain for the help desk under "Site URL", and enter the same URL in the "App Domains" field above.
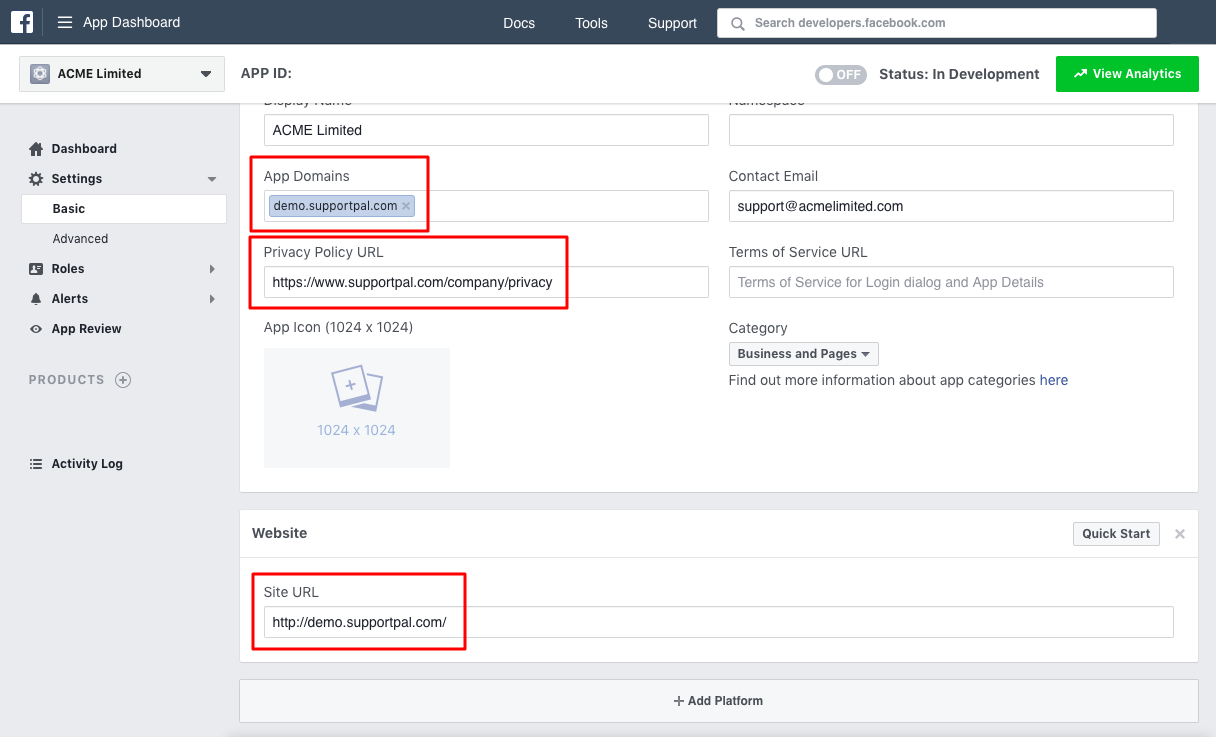
7. Click "Save Changes."
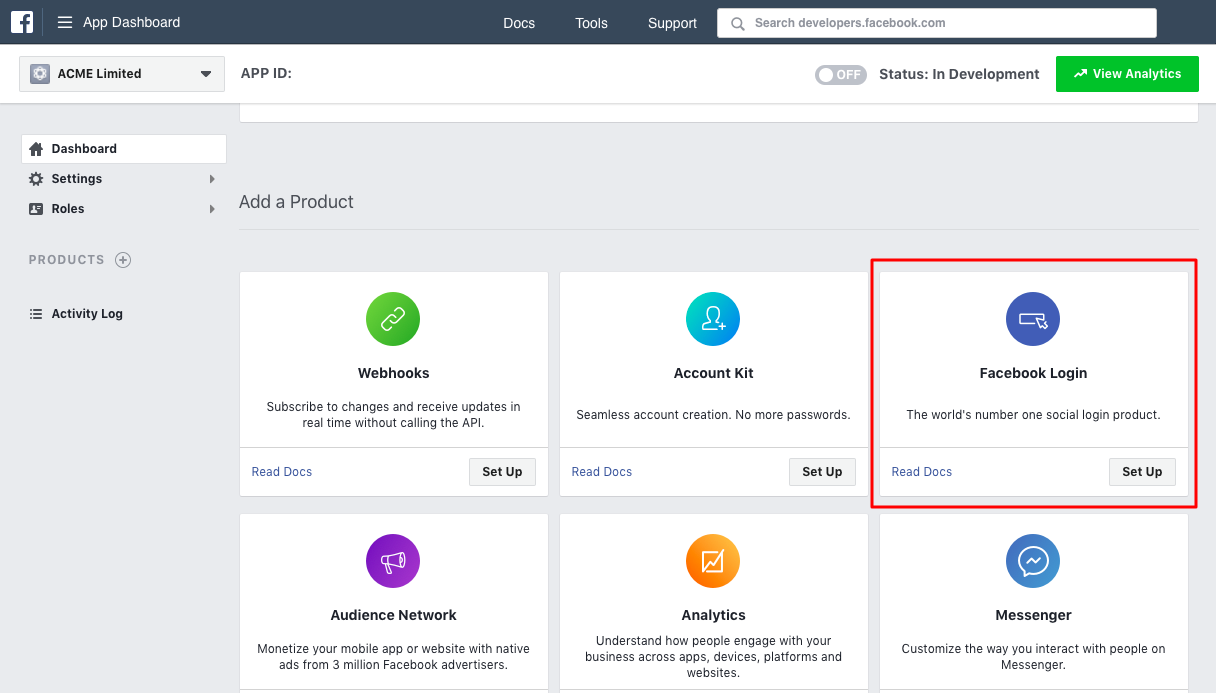
8. Under "Products" in the sidebar click "Add Product". Hover over the Facebook Login option and click on the "Set Up" button that appears.
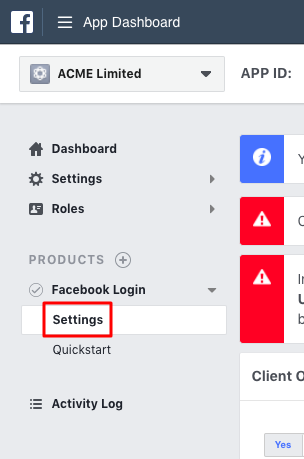
9. Click "Settings" in the sidebar under the "Facebook Login".
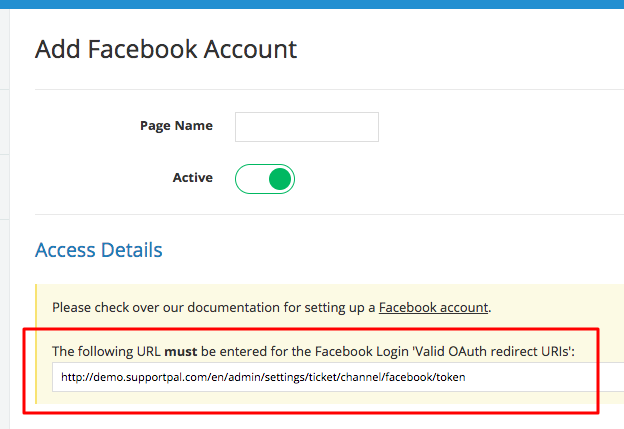
10. Find your token URL when you go to add/edit a Facebook account in the help desk operator panel, and enter this in to the "Valid OAuth redirect URIs" field.
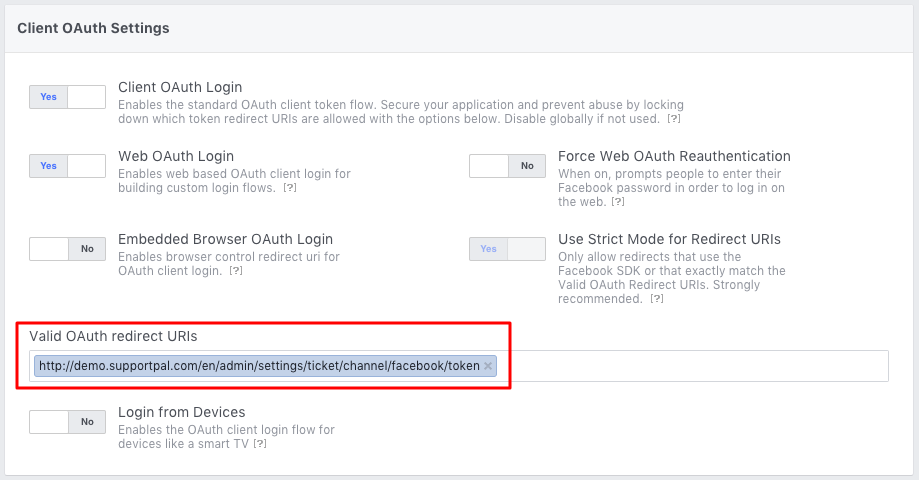
11. Click "Save Changes".
### Create an Account
To create a new account, or update an existing one, please follow the following steps.
1. Visit **Settings -> Tickets -> Channels** in SupportPal and click on the "Settings" link on the Facebook channel row. If you're creating a new account click "Add Account", or if you're updating an existing account, search for it and click the edit (pencil) icon on the right side of the table row.
2. Complete the input fields:
1. **Page Name** - Enter the page name.
2. **Active** - If the account is active and should be included when polling for new posts and messages.
3. **Page ID** - The page ID found on the "About" tab on the Facebook page (See [Setting up your Facebook Account For Access](#SettingUp)).
4. **Application ID** - The app ID found on the application page (See [Setting up your Facebook Account For Access](#SettingUp)).
5. **Application Secret** - The app secret found on the application page (See [Setting up your Facebook Account For Access](#SettingUp)).
6. **Import From** - Lets the ticket importing start from a specified date, for example set to today's date to avoid any old posts and messages being imported. This option is only available for new accounts.
7. **Default Department** - Select the department in which messages sent to this account should be opened as tickets in.
8. **Default Priority** - Select the priority with which tickets opened by this account are set as.
3. Once all the details have been entered, click the "**Get Access Token**" button and you will be redirected to Facebook. **App Roles**
Before clicking "Get Access Token" please ensure that your Facebook account is listed as an administrator or developer under "**Roles**" in the Facebook app dashboard. This allows you to request permissions without getting your app reviewed by Facebook.
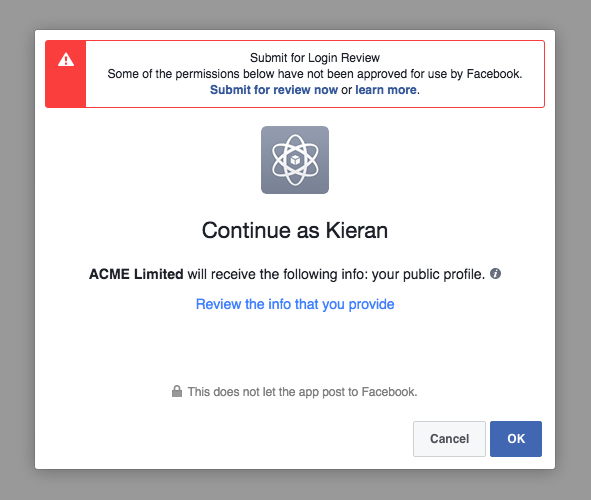
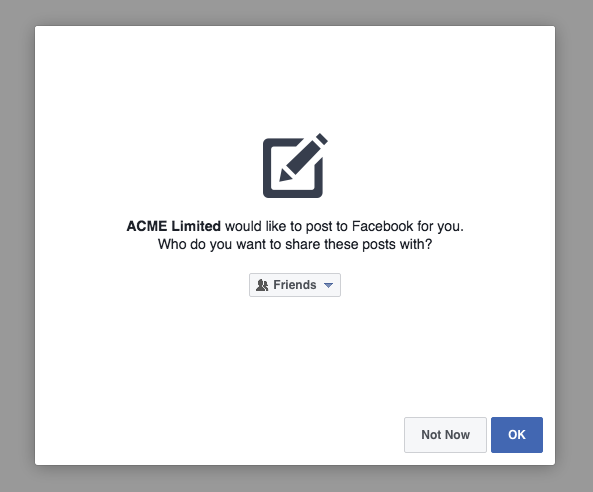
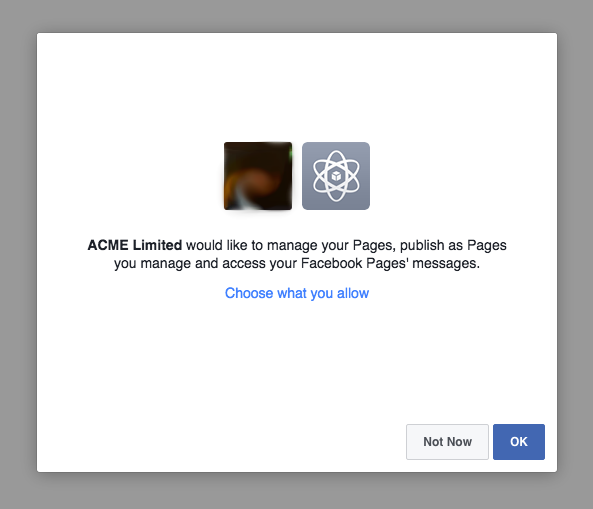
Follow through all the popups that are shown, which will just be making sure that you are allowing the application to post on the page's behalf. You will not have to change any of the permissions, simply press "**OK**" on each popup window as seen in the screenshots below. **Information**
Please disregard the big red "Submit for Login Review" message. We will do this next (see below).
Finally you will return back to the help desk with an access token.
4. Click the "**Submit**" button to finish.
### App Review
**Why?**
If you don't go through app review, anything published by your app will **not** be visible to other Facebook users (see [https://developers.facebook.com/docs/apps/review/faqs#faq\_959251624152434](https://developers.facebook.com/docs/apps/review/faqs#faq_959251624152434)).
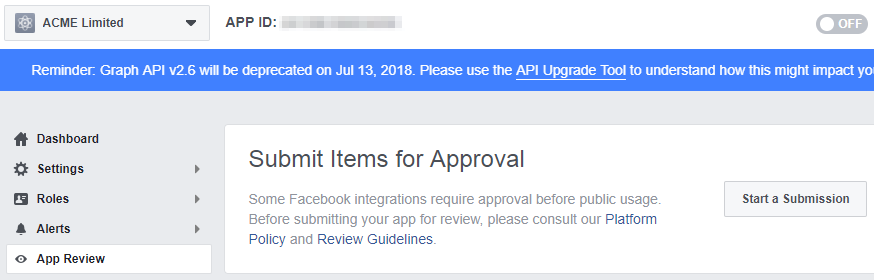
1. Select **App Review** in the sidebar of your app, and click the **Start a Submission** button.
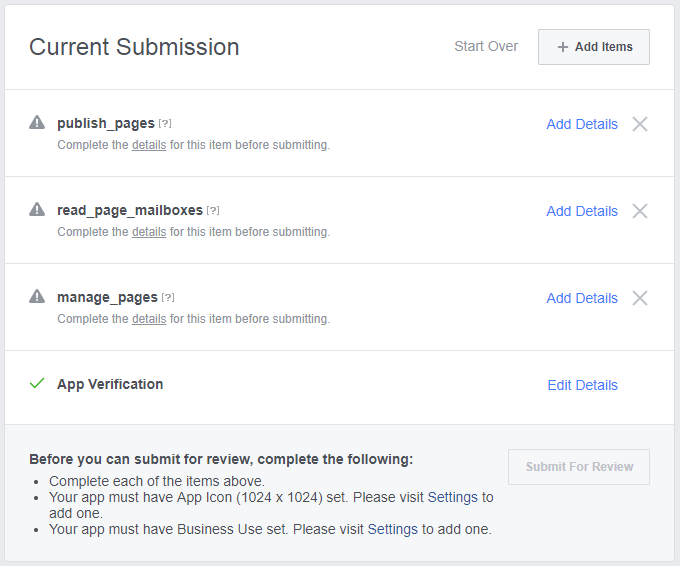
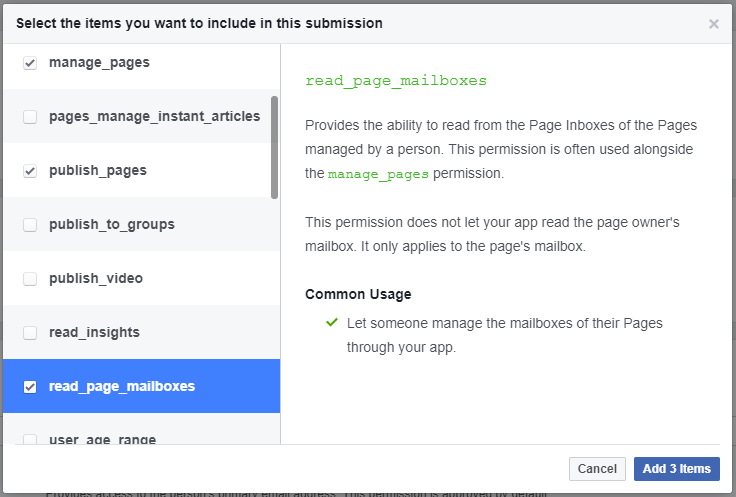
2. In the popup window, select the following permissions: `manage_pages`, `publish_pages`, `read_page_mailboxes`.
3. You will then need to detail how each of these permissions are used within SupportPal.
4. Click **Add Details** for the **publish\_pages** permission, and fill out the fields using the information provided below:
1. **How is your app using publish\_pages?**
Lets people publish content or respond to posts and comments as a Page (also requires `manage_pages`).
2. **What platforms does your app use publish\_pages on?**
Web
3. **Step-by-step instructions:**
**Information**
Replace the operator login information (URL, email and password) with the details created during the prerequisites above.
Definitions:
- OPERATOR - company staff, must be authenticated via SupportPal login.
The SupportPal application uses a periodic cron task to fetch Facebook user communications (page messages and visitor posts). Facebook user communications automatically create a SupportPal ticket which is ONLY visible to authenticated OPERATORs. Authenticated OPERATORs can then reply to the Facebook user communication on behalf of the Facebook page.
1. Send a message to the Facebook page
2. Login to OPERATOR interface:
- URL: https://demo.supportpal.com/en/admin/login
- Email: facebook-user@demo.com
- Password: facebook123
3. Browse to Settings > Scheduled Tasks and click the arrows on the Check Facebook accounts task to force it to run.
4. Browse to Manage Tickets and see the user’s message has been converted to a ticket (visible in the table).
5. Click on the ticket subject, and the authenticated OPERATOR can reply to the ticket which will be posted to the Facebook private messages conversation.
It is only possible for authenticated OPERATORs to reply to existing tickets.
It's not possible to publish individual posts to Facebook.
4. **Screencast:** Download the video and attach it to your submission
5. Click **Add Details** for the **read\_page\_mailboxes** permission, and fill out the fields using the information provided below:
1. **How is your app using read\_page\_mailboxes?** Lets people manage the mailboxes of their Pages through the app.
2. **What platforms does your app use read\_page\_mailboxes on?** Web
3. **Step-by-step instructions:** **Information**
Replace the operator login information (URL, email and password) with the details created during the prerequisites above.
Definitions:
- OPERATOR - company staff, must be authenticated via SupportPal login.
The SupportPal application uses a periodic cron task to fetch page messages. After someone sends a message to the Facebook page, the message will appear in the SupportPal OPERATOR interface as a new ticket.
1. Send a message to the Facebook page
2. Login to OPERATOR interface:
1. URL: https://demo.supportpal.com/en/admin/login
2. Email: facebook-user@demo.com
3. Password: facebook123
3. Browse to Settings > Scheduled Tasks and click the arrows on the Check Facebook accounts task to force it to run.
4. Browse to Manage Tickets and see the user's message has been converted to a ticket (visible in the table).
5. Click on the ticket subject, and the authenticated OPERATOR can reply to the ticket which will be posted to the Facebook private messages conversation.
The imported Facebook post is ONLY visible to authenticated OPERATORs via the OPERATOR interface.
4. **Screencast:** Download the video and attach it to your submission
6. Click **Add Details** for the **manage\_pages** permission, and fill out the fields using the information provided below:
1. **How is your app using manage\_pages?** Lets people publish content or respond to posts and comments as a Page (also requires `publish_pages`).
2. **What platforms does your app use manage\_pages on?** Web
3. **Step-by-step instructions:** **Information**
Replace the operator login information (URL, email and password) with the details created during the prerequisites above.
Definitions:
- OPERATOR - company staff, must be authenticated via SupportPal login.
The SupportPal application uses a periodic cron task to fetch page visitor posts. After someone creates a visitor post to the Facebook page, the message will appear in the SupportPal OPERATOR interface as a new ticket.
1. Post a "status" to the Facebook page as a Facebook user
2. Login to OPERATOR interface:
- URL: https://demo.supportpal.com/en/admin/login
- Email: facebook-user@demo.com
- Password: facebook123
3. Browse to Settings > Scheduled Tasks and click the arrows on the Check Facebook accounts task to force it to run.
4. Browse to Manage Tickets and see the user's message has been converted to a ticket (visible in the table).
5. Click on the ticket subject, and the authenticated OPERATOR can reply to the ticket which will be added as a comment on behalf of the Facebook page to the visitor post.
The imported Facebook post is ONLY visible to authenticated OPERATORs via the OPERATOR interface.
4. **Screencast:** Download the video and attach it to your submission [https://drive.google.com/file/d/1pZdn5vSN5KM8lbXVCtjwEGQ\_0x6WYSkP/view?usp=sharing](https://drive.google.com/file/d/1pZdn5vSN5KM8lbXVCtjwEGQ_0x6WYSkP/view?usp=sharing)
7. Set an App Icon and for Business Use select "Support my own business".
8. Click the "Submit For Review" button.
### Business Verification
After you submit your app your review, Facebook *may* also require [business verification](https://developers.facebook.com/docs/apps/review#business-verification).
### App Review Successful
Once your app has been accepted by the app review process, it is **critically important** that you switch the app from "development mode" to "public". This ensures that content published by the app is visible to other Facebook users.
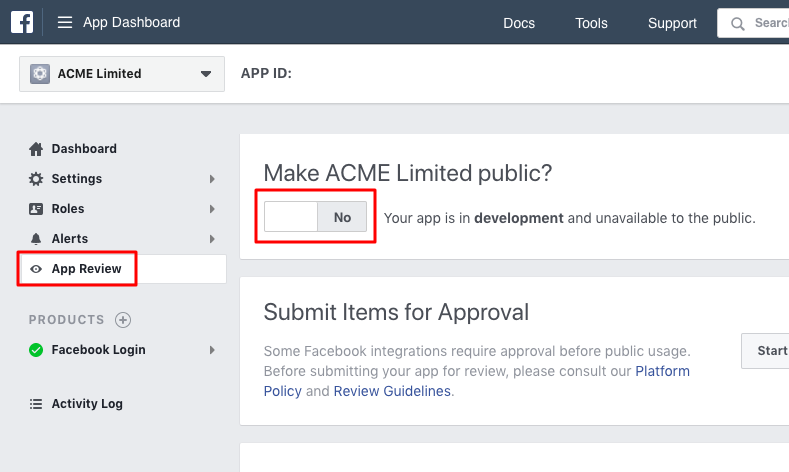
1. Click "App Review" and toggle the option to make the application public, follow the steps shown.
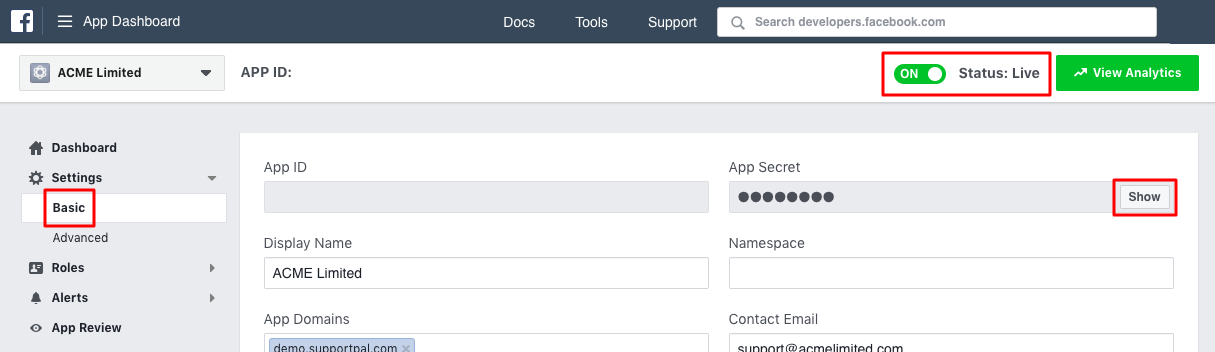
2. Ensure the application shows as status "**Live**"
## Delete an Account
To delete an account, follow the below steps:
1. Visit **Settings -> Tickets -> Channels** and click on the "Settings" link on the Facebook channel row.
2. Search for the account you wish to delete.
3. Click the delete (cross) icon located on the right of the table.
4. Click on the left button, "Yes, I'm sure", that pops up confirming you would like to delete this account and it will then be deleted.
## Modifying the Polling Time
The active accounts are polled automatically by a scheduled task (See Scheduled Tasks). Edit the scheduled task to change the polling frequency and you can manually run the task to verify it's working.